As digital privacy and online security gain increasing attention, many users are searching for solutions that combine anonymity, data protection, and secure Bitcoin transactions. One highly effective combination is using Tails with the Electrum wallet to manage bitcoins.
In this article, we’ll explain how Tails and the Electrum wallet work and provide a step-by-step guide on using them together.
Let’s get started!
Table of Contents
What is Tails?
Tails (The Amnesic Incognito Live System) is a privacy-focused, Debian-based operating system designed to provide anonymity and security.
It runs directly from a USB stick or DVD, leaving no traces on the computer it’s used on. By default, Tails stores system data in the computer’s RAM, which is erased as soon as the computer is powered off (unless the user opts to save data in an encrypted partition—don’t worry, we’ll show you how to set this up later).
Another standout feature of Tails is its ability to route all internet traffic through the Tor network, offering users a high level of anonymity online.
What is Electrum?
Electrum is a lightweight, open-source Bitcoin wallet known for its security and reliability. It offers advanced features such as multi-signature transactions, hardware wallet integration, and decentralized transaction verification.
As a lightweight wallet, Electrum doesn’t require downloading the entire Bitcoin blockchain, making it fast and convenient to use, especially on resource-limited systems like Tails.
Why Combine Tails and Electrum?
Combining Tails and Electrum creates a powerful solution for enhanced security and privacy.
Tails safeguards user privacy by anonymizing identity and location through the Tor network, while Electrum offers a secure and reliable platform for managing bitcoins. Together, they enable anonymous financial transactions, keeping personal data and private keys safe from attackers or potential breaches.
Requirements for setting up Tails
In this tutorial, we’ll guide you through configuring Tails on Windows, following the official Tails website’s instructions.
To set up and use the Electrum wallet on Tails, you’ll need:
- A USB drive with at least 8 GB of storage for Tails.
- A Windows computer running Windows 7 or later.
- A system with at least 2 GB of RAM and a 64-bit architecture (unsure if your machine meets these specs? Check here).
- The latest version of Tails, which you can download from the official Tails website.
- Optional: A phone or secondary device to follow this tutorial while setting up your computer. 🙂
Step-by-step Tails setup
1. Downloading and Installing Tails
As mentioned, the first step is to download Tails on the official Tails website and create a startup pendrive
1.1 Download Tails:
Visit the Tails website, navigate to the “Download Tails” section as shown in the screenshot below, and download the latest version of Tails.
1.1.1 (Optional) Verify the Tails image signature:
Verifying file signatures is important to ensure the downloaded file hasn’t been corrupted or maliciously modified during the download process.
Once verification is complete, you should see the following message.
1.2 Installation on USB Drive:
Now, you’ll need software to write the Tails image to your USB drive, such as Etcher.
After downloading Etcher, you can close your browser. Then, go to the Downloads folder (or the folder where you saved the Etcher app) and run the app.
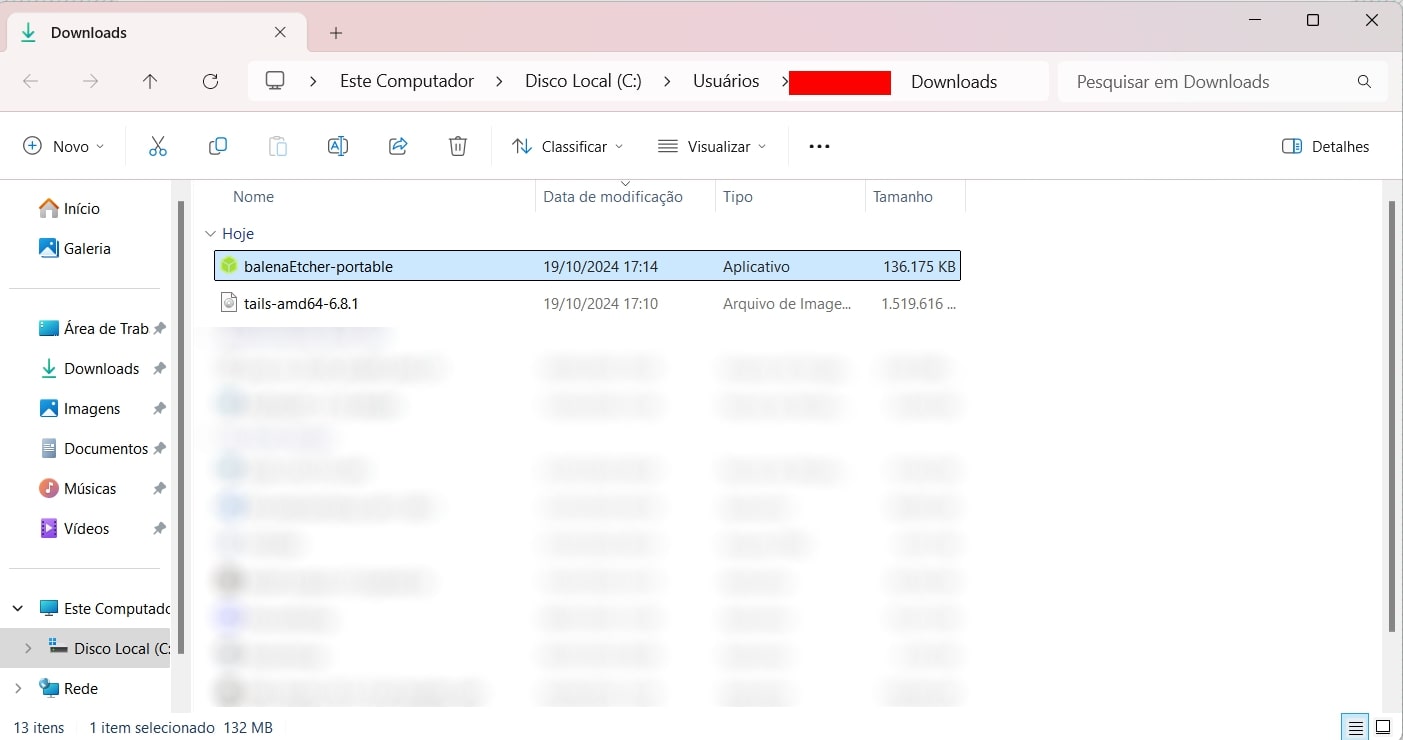
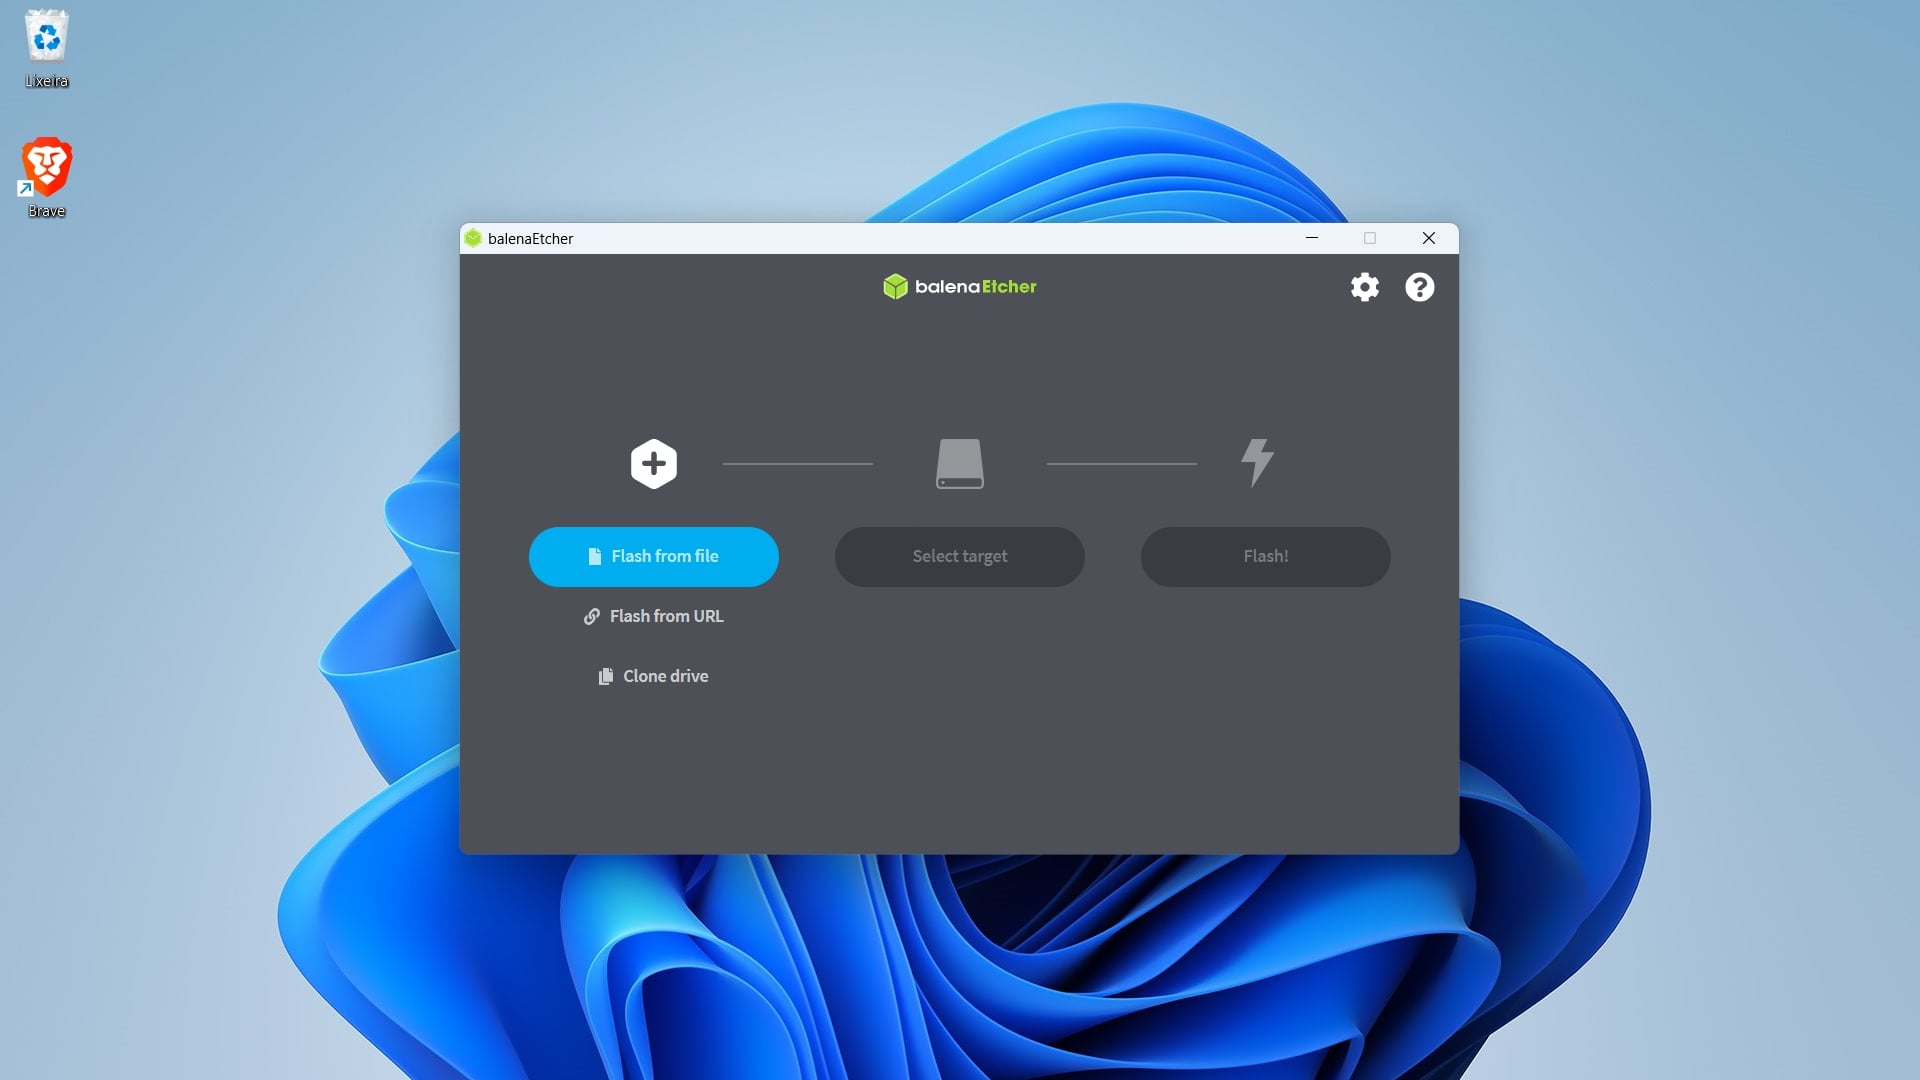
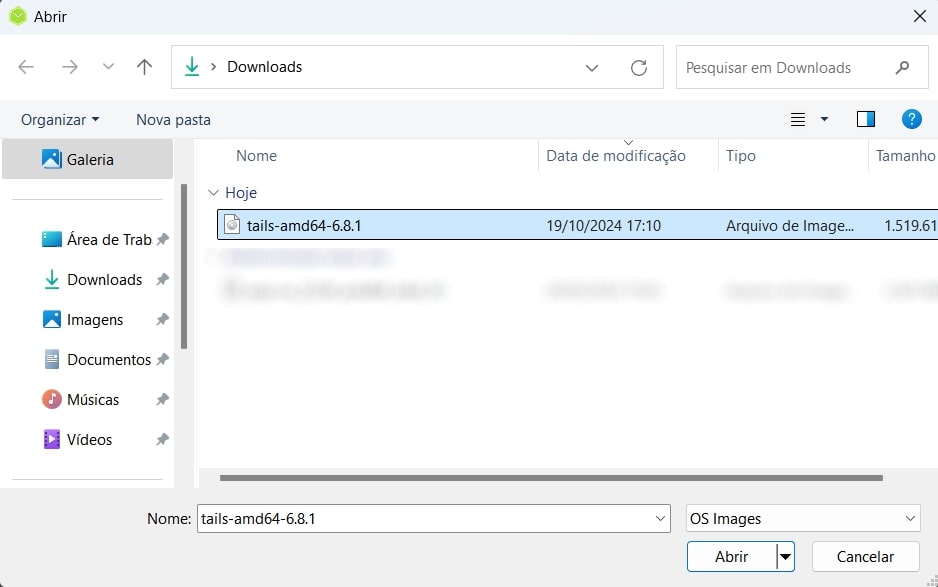
Click the blue “Flash from file” button and select the Tails image you just downloaded (in our first step).
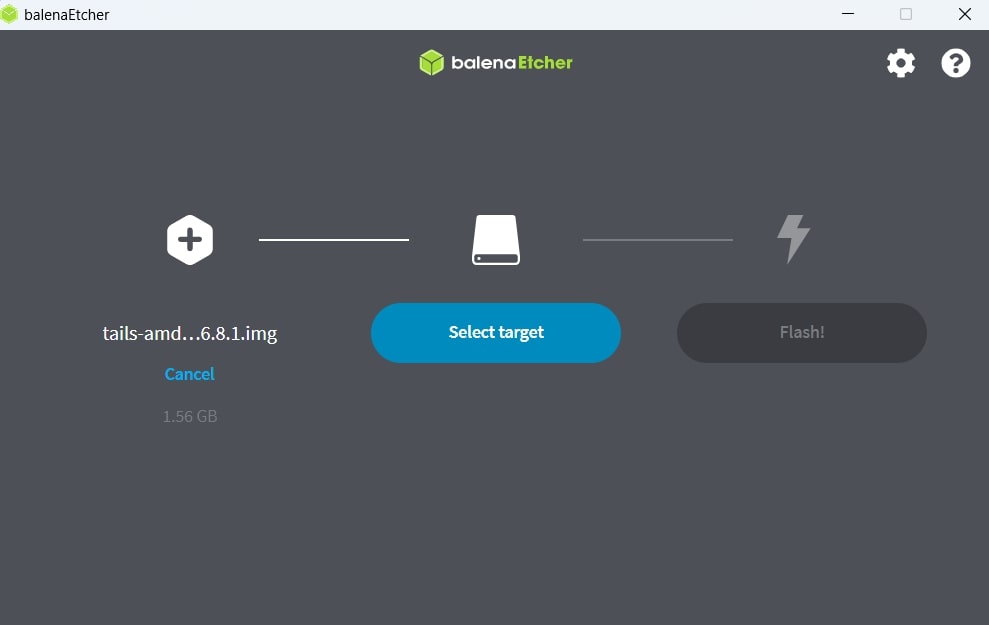
After selecting the image, we’ll now choose the device to write the image to (your USB drive).
Click the blue middle button “Select target” and choose your USB drive.
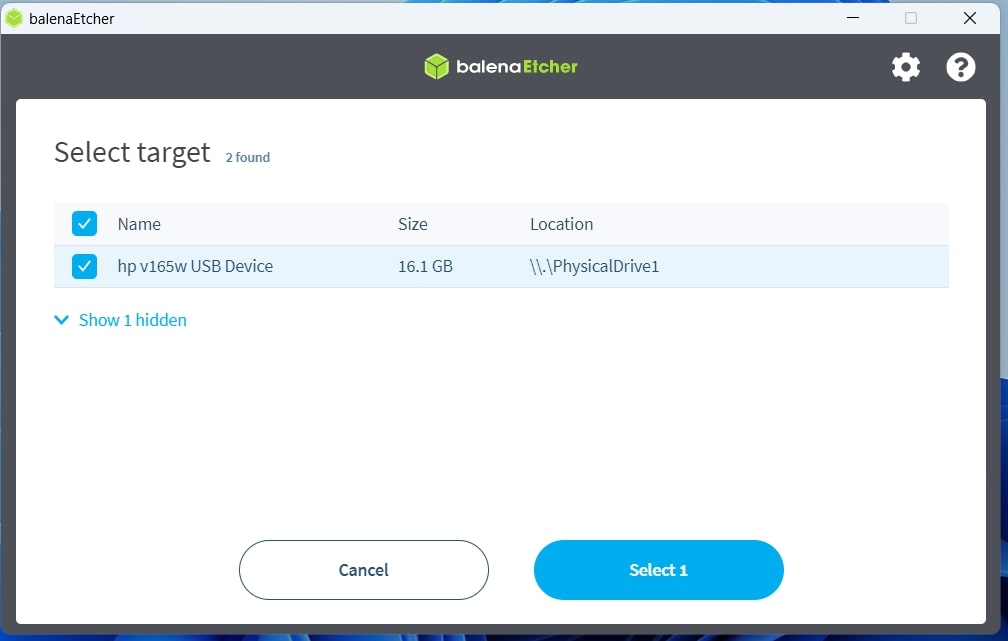
Finally, click the last blue button “Flash” to finish the process of writing Tails to the USB drive.
Now, just wait for the process to complete.
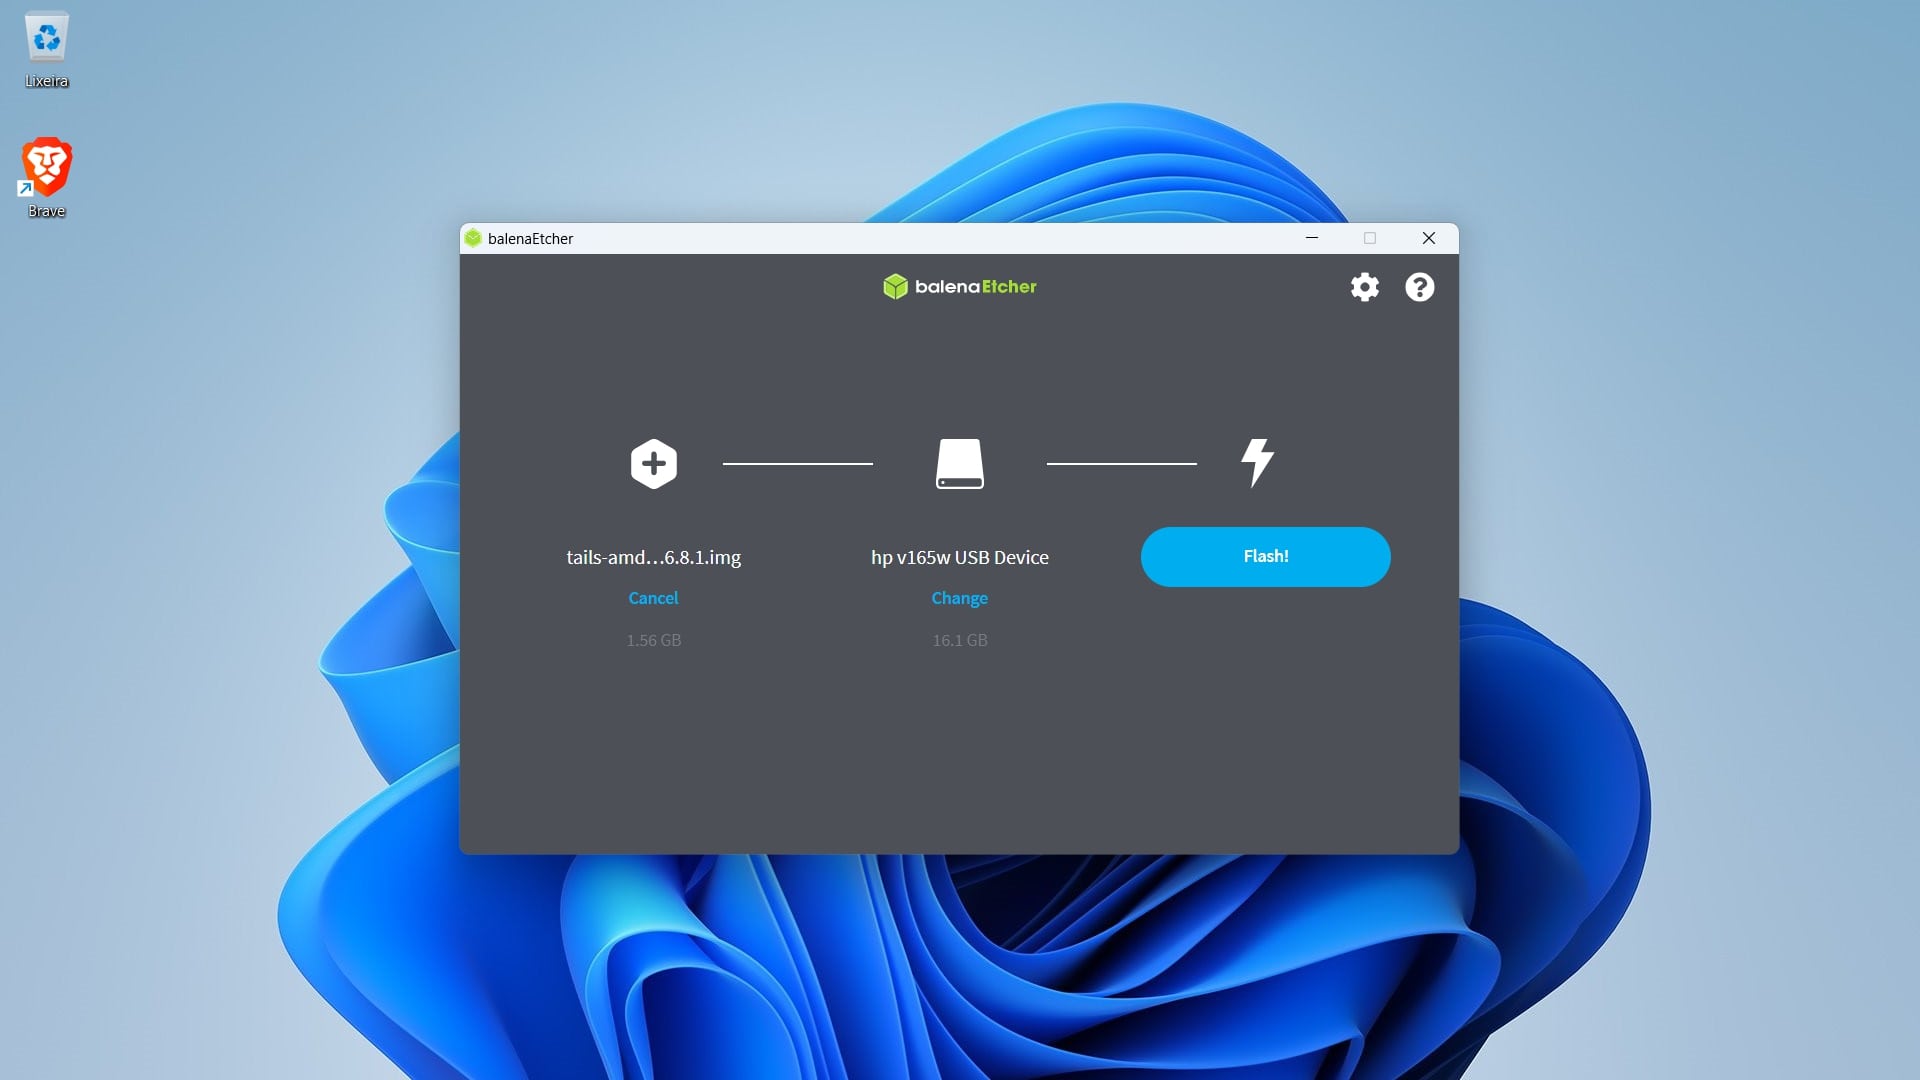
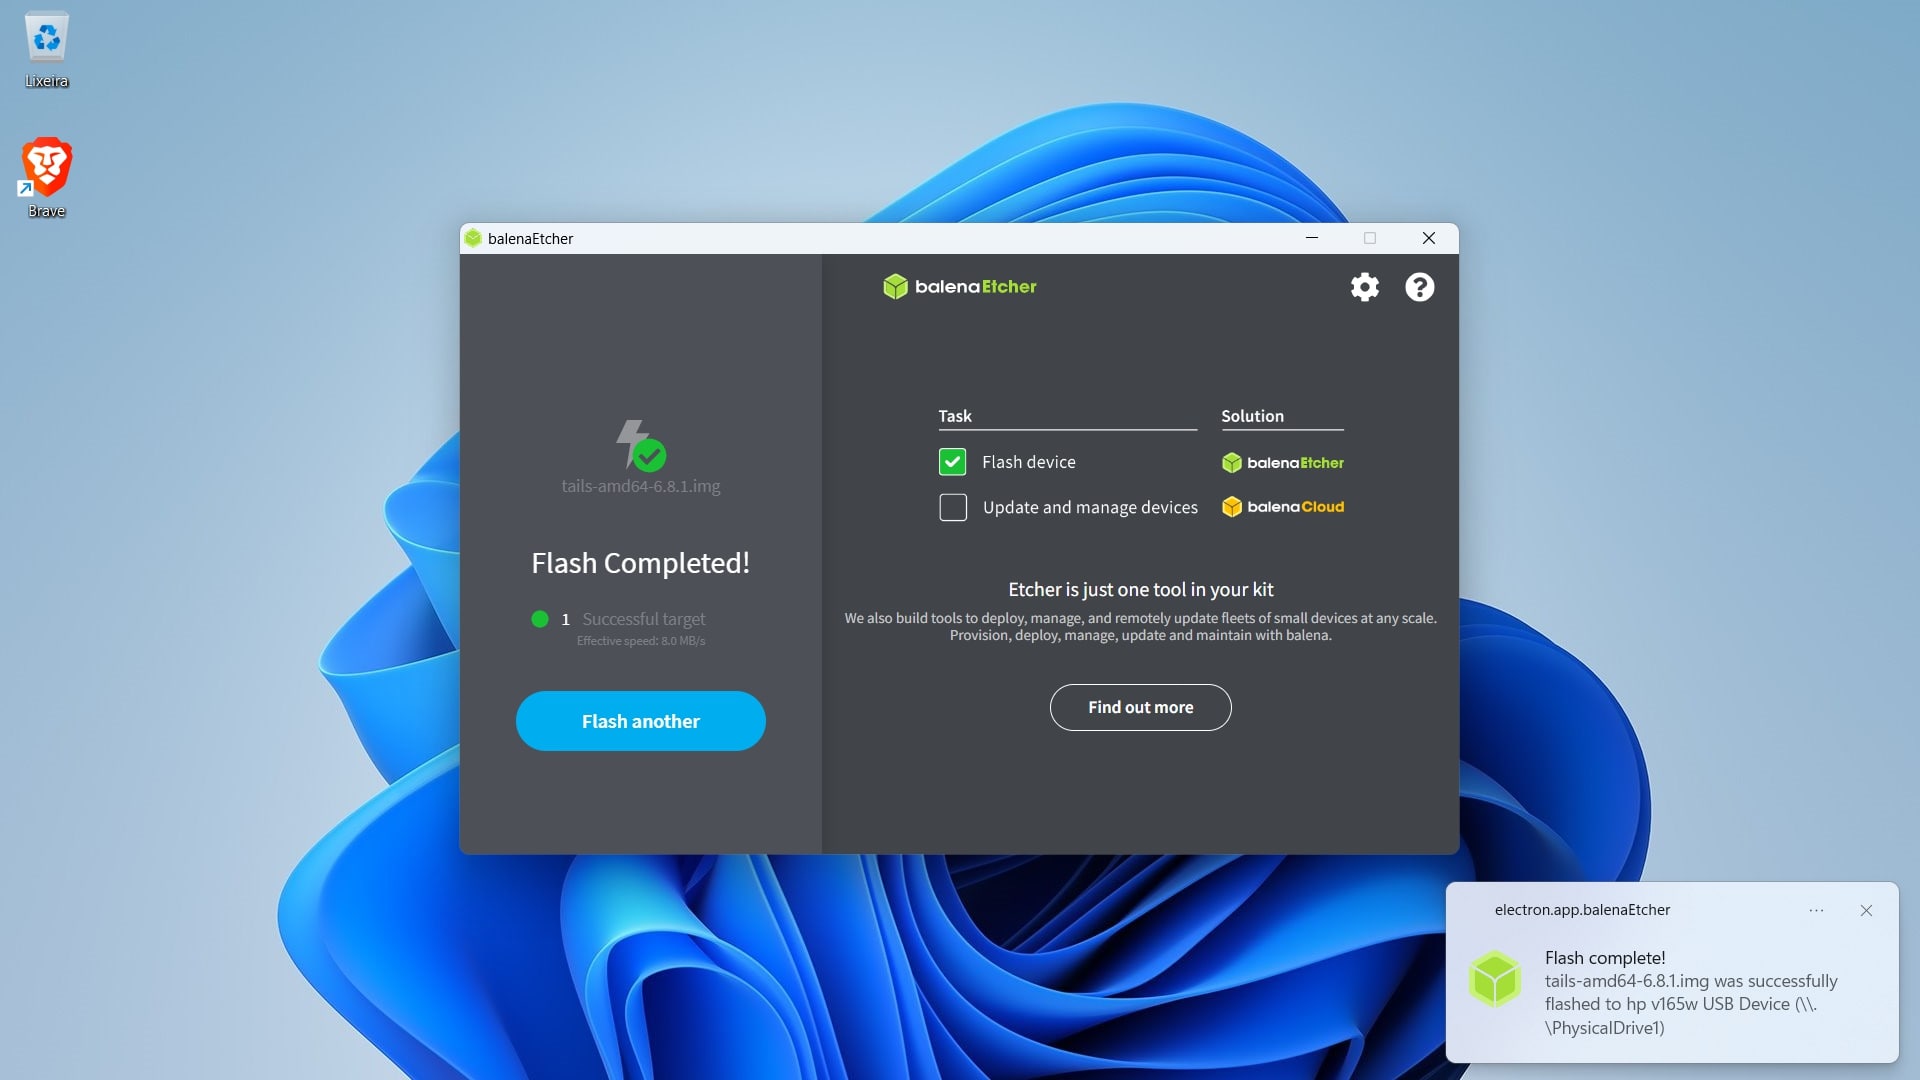
Success! You’ve now configured your USB drive with the Tails Operating System.
1.3 Booting Tails
With the flash drive connected to the computer, configure the system to boot from the USB.
On Windows, you can do this by opening the Start menu in the bottom bar, then holding down the Shift key, and clicking On/Off ▸ Restart.
Now, click on “Use a device” and select your pendrive with the tails image. If there is no option with “tails” in the name, choose the option that has “Removable Device“
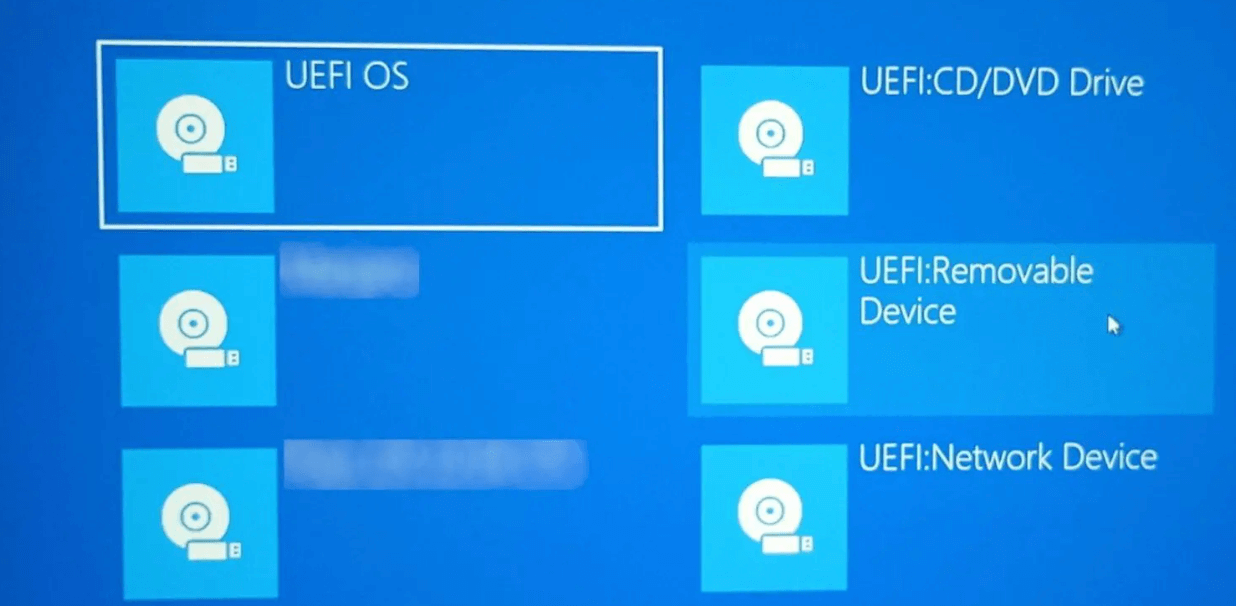
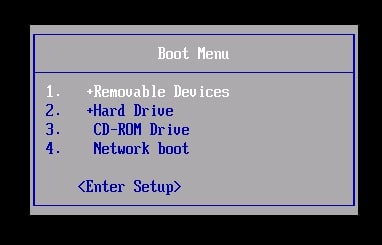
Depending on the model of your computer, you may still need to access your system’s BIOS or boot menu to select the flash drive.
If all goes well, you will finally see the Tails selection screen.
Select the first option:
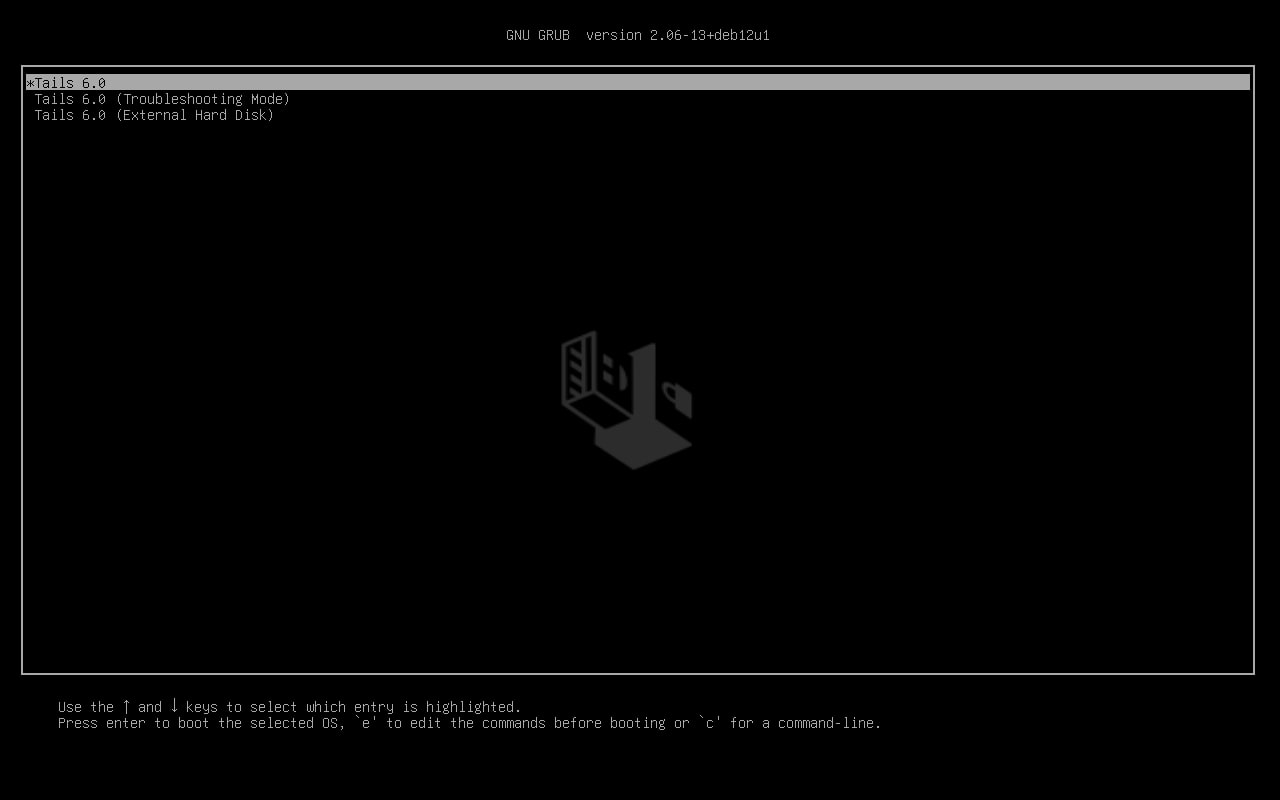
And that’s it, easy, right? But it’s not over yet!
On the next screen you will see the settings of your Tails. Now, click on “Start Tails“.
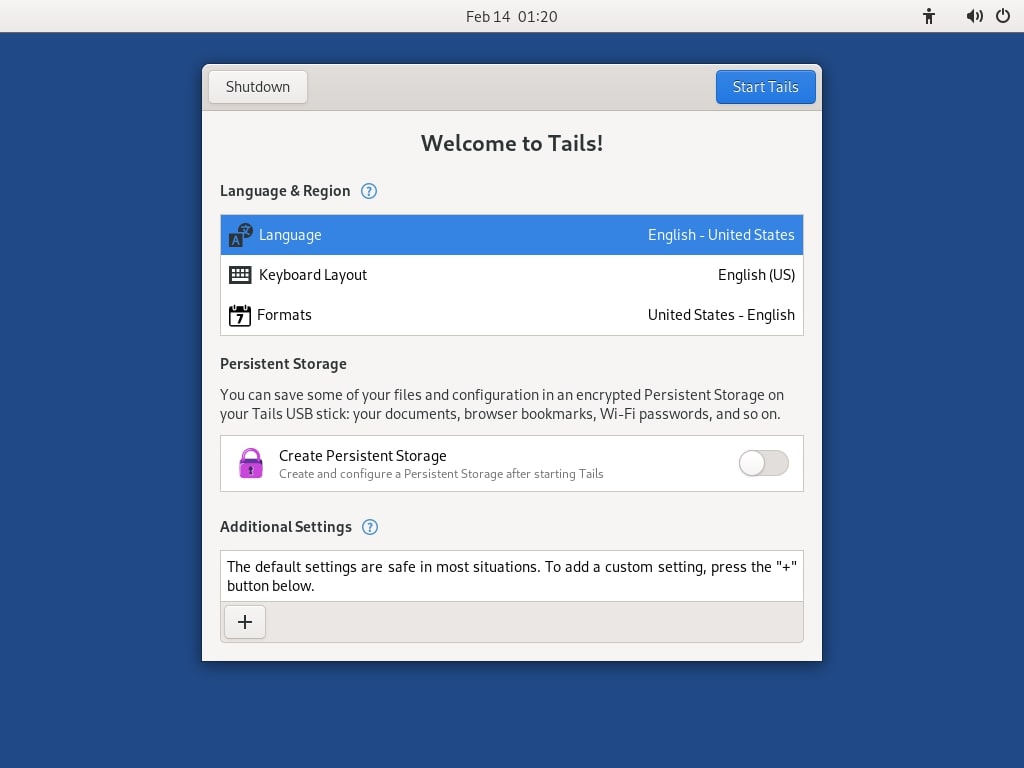
2. Initial Configuration of Tails
Once Tails starts, you will be presented with a welcome screen (similar to the previous one) where you can configure the language, keyboard layout, and other settings.
Preferably, do this after setting up the persistent storage on the device. Since Tails has an “amnesic” nature, it will “forget” all data not saved in persistent, encrypted storage (hence its magic and its great appeal for privacy purposes).
So, let’s set up the persistent storage in Tails:
2.1 Setting up the Persistent Storage
One of the key features of Tails is the ability to create persistent and encrypted storage. This allows you to securely save files and data between Tails sessions.
We will enable this feature to save the private keys of your Electrum wallet for future use.
In the main environment:

Click on “Applications”, then on “Persistent Storage”, and on the next screen, click “Continue”.

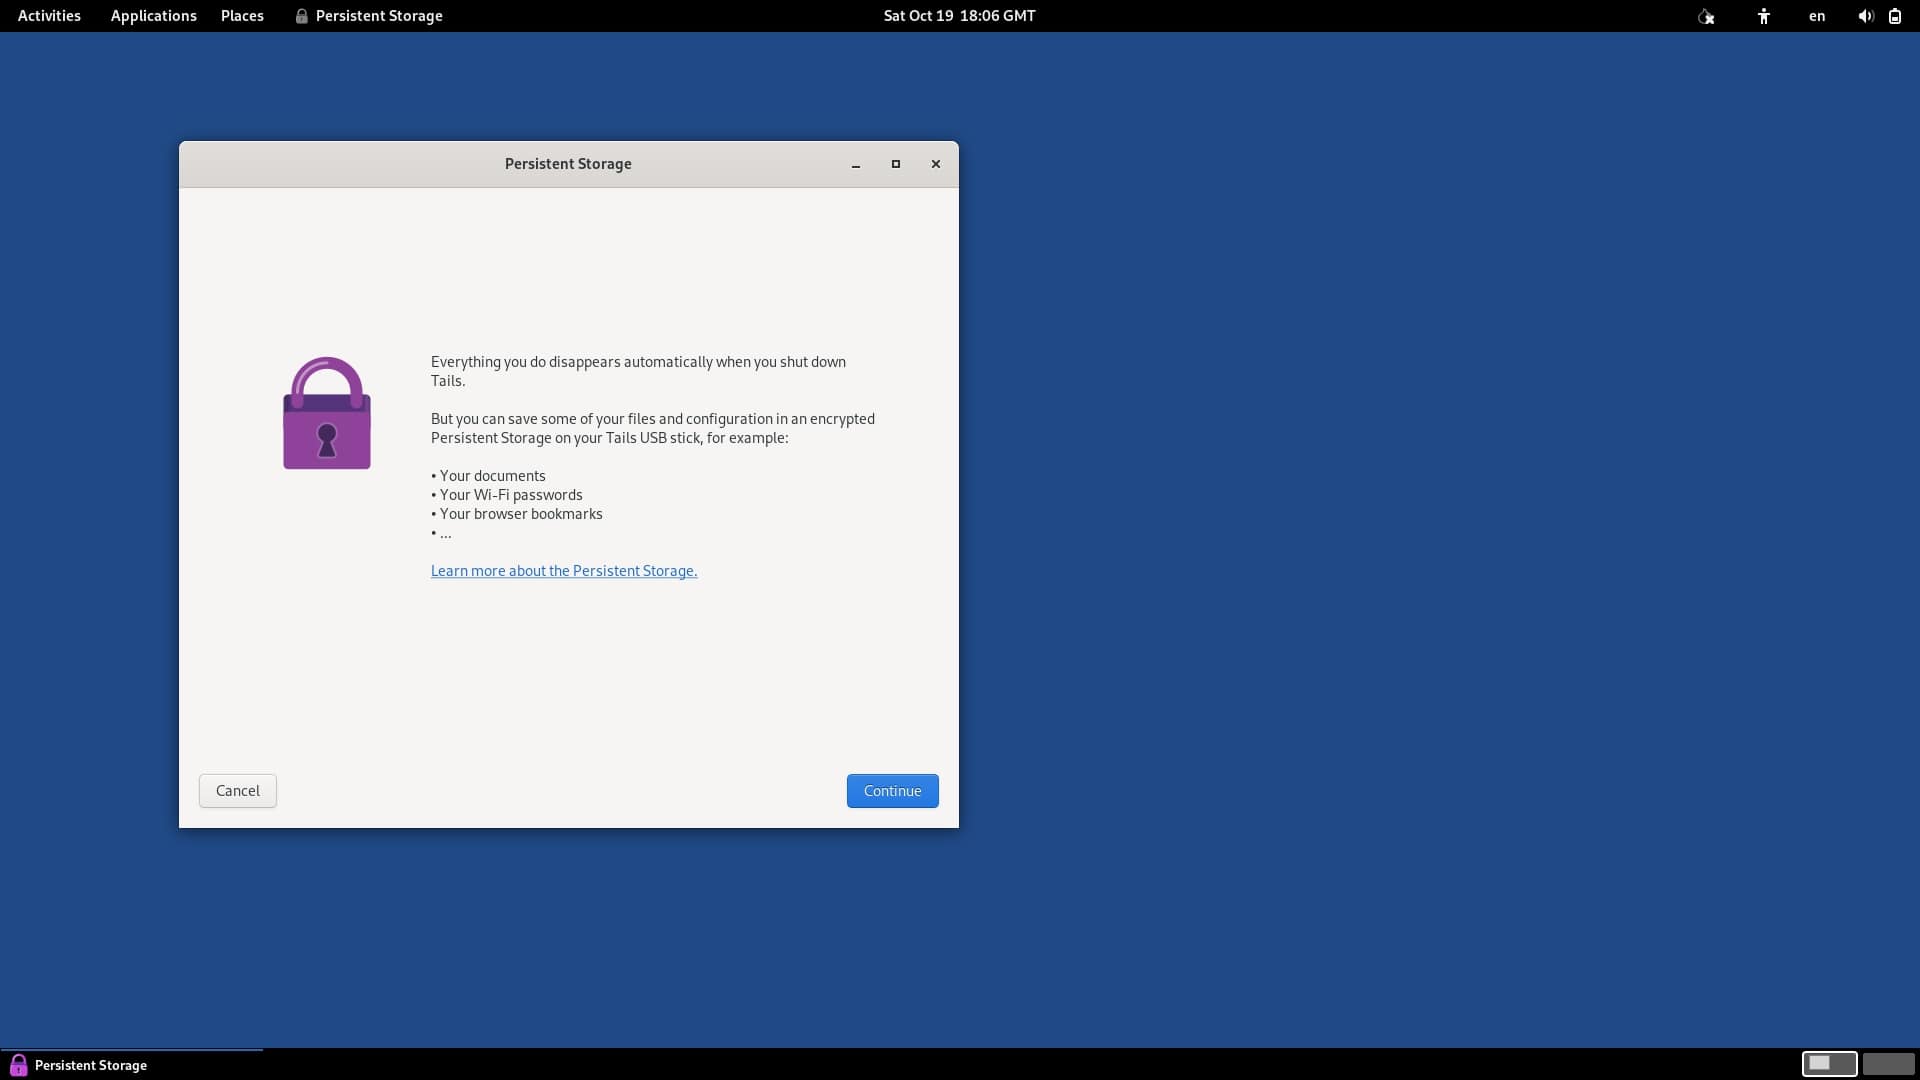
On the following screen, choose a strong password.
This step is crucial, as if someone gains physical access to your USB drive, they could access everything stored on your Tails, except for your Electrum wallet (as we will configure a password for it later).
Nevertheless, an ounce of prevention is worth a pound of cure. So, after ensuring you’ve chosen a strong password, click “Create Persistent Storage”.
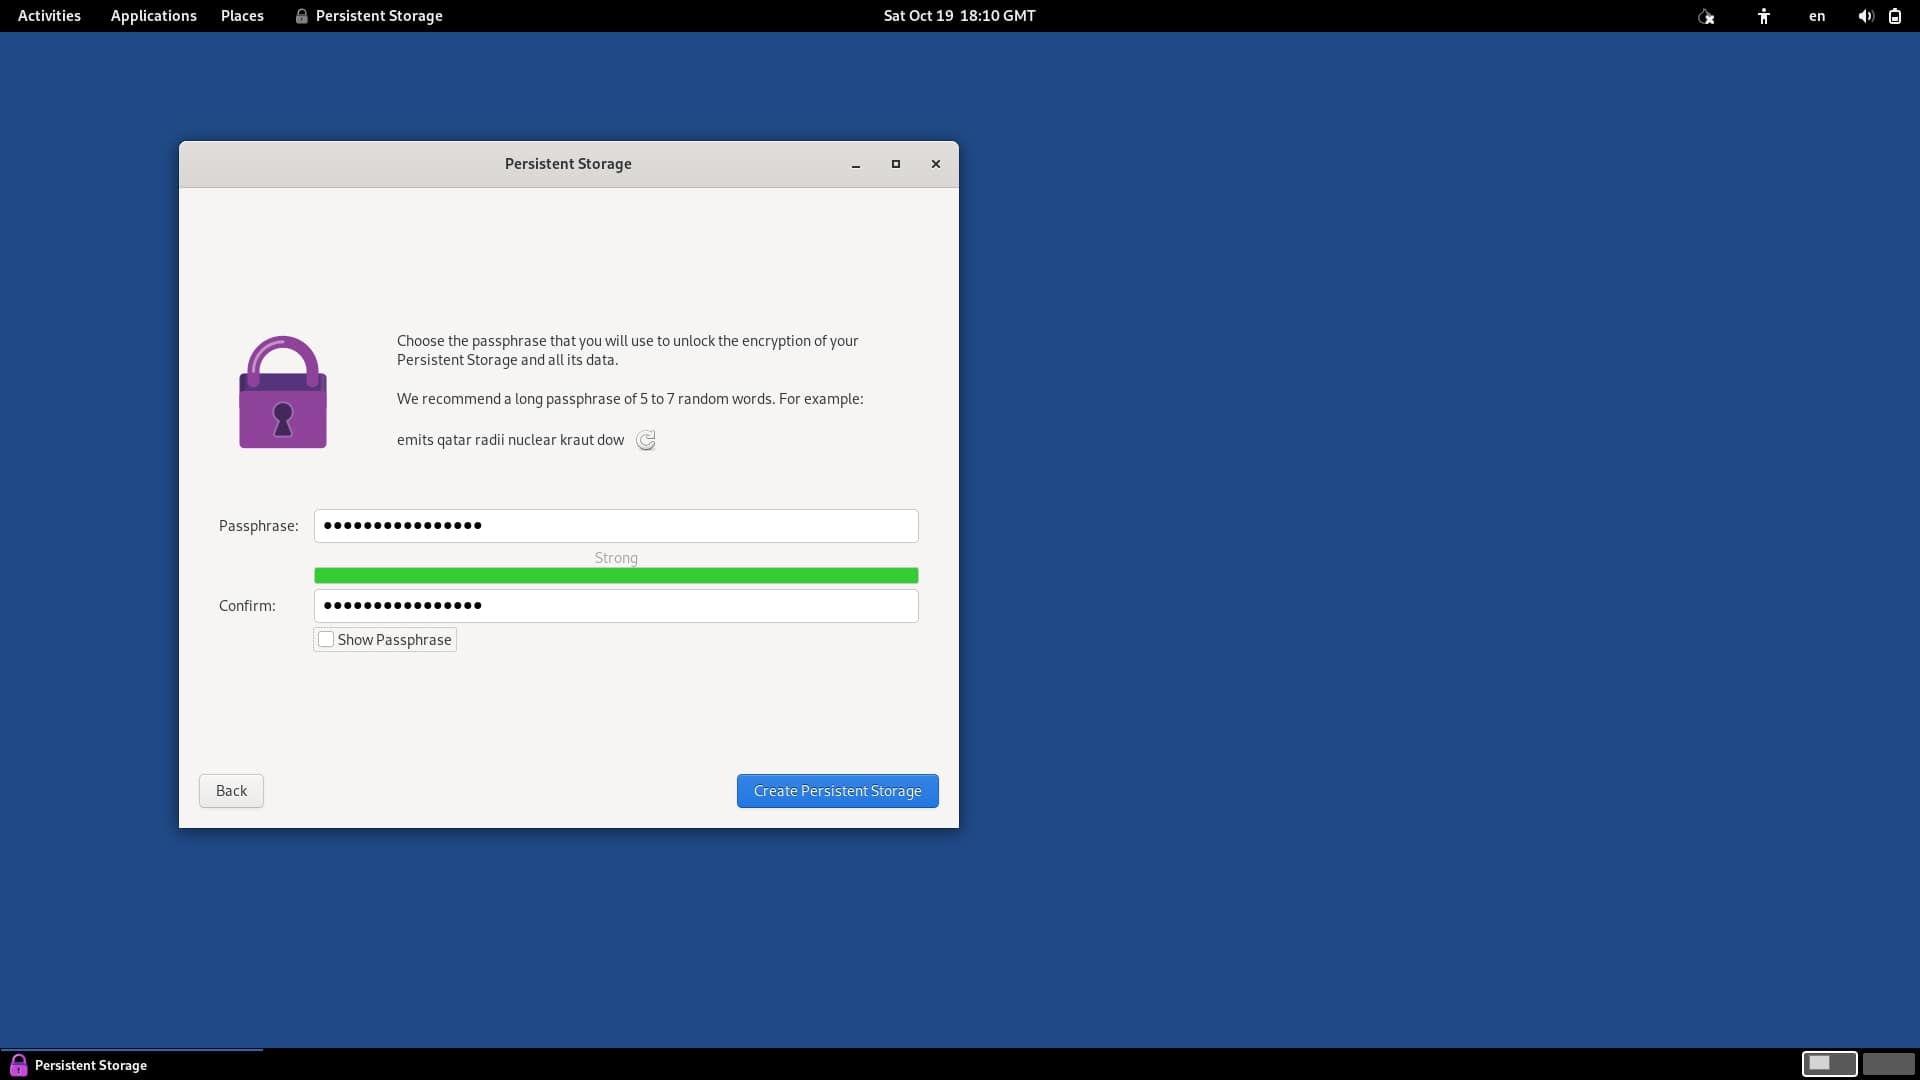
On the next screen, activate the options exactly as shown in this tutorial. Therefore, only disable or enable what you deem necessary if you know what you’re doing.
In the “Personal Documents” section, keep the “Persistent folder” option enabled.

In the “System Settings” section, keep the “Welcome Screen” option enabled.

In the “Network” section, enable “Network Connections” (to save Wi-Fi passwords, for example).

In the “Applications” tab, enable the “Electrum Bitcoin Wallet” option (to save your Electrum wallet settings) and optionally enable the “GnuPG” option if you plan to verify GPG keys in the future (e.g., downloading Ian Coleman’s BIP39 seed generator and verifying the software’s integrity later).
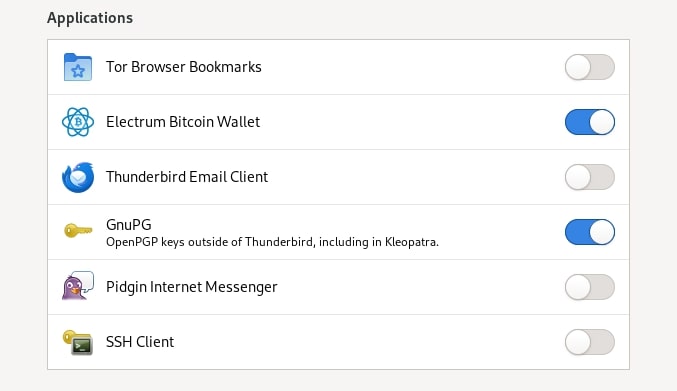
Finally, in “Advanced Settings”, keep the “Additional Software” option enabled.

Done! Now just restart your computer, and your Tails will be 100% configured. This time, when logging in, remember to enter the password for your persistent storage.
To do this, enter the password for your persistent storage volume in “Persistent Storage” and click “Unlock Encryption”.
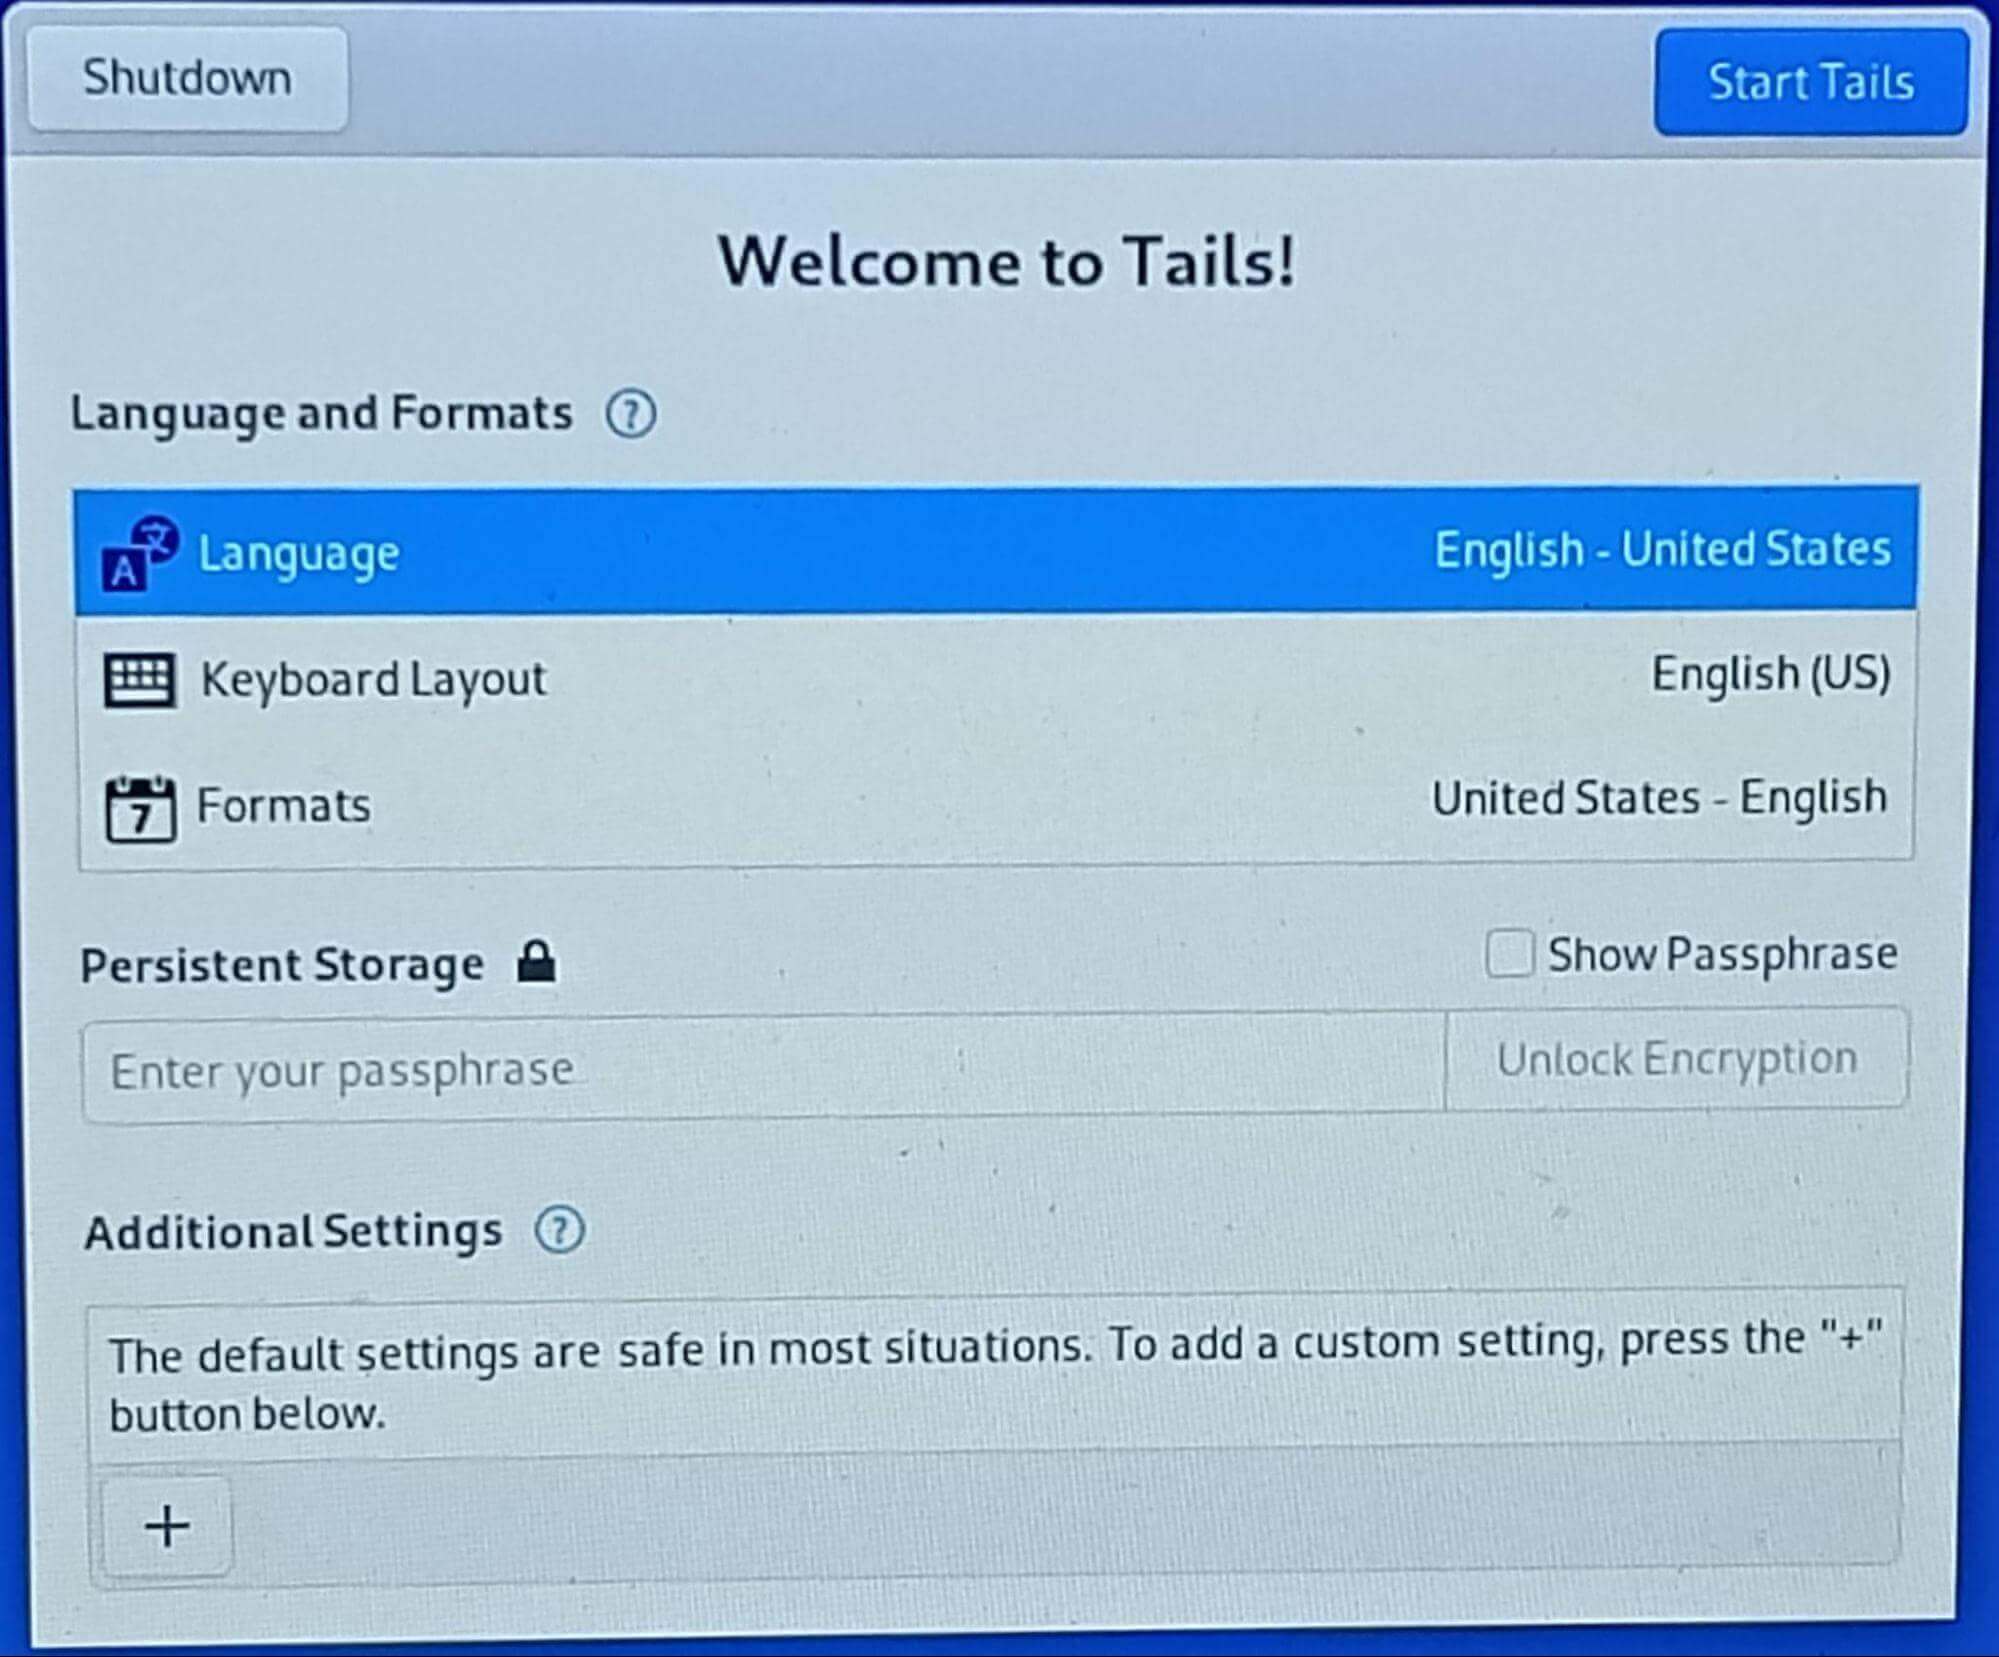
After a while, the settings for your persistent storage will be loaded.
When everything is ready, click “Start Tails”.
Next, we’ll finally configure our Bitcoin wallet in Electrum.
3. Setting up the Electrum Wallet
Electrum comes pre-installed on Tails, eliminating the need for additional downloads. Follow one of the three options below to open the Electrum app:
Go to Applications (top left corner of the screen) → Internet → Electrum Bitcoin Wallet.
Go to Activities → All Applications (nine dots in the bottom bar) → Search for Electrum Bitcoin Wallet.
Go to Activities → All Applications (9 dots in the bottom bar of the screen) → Search in the top bar for Electrum → Electrum Bitcoin Wallet
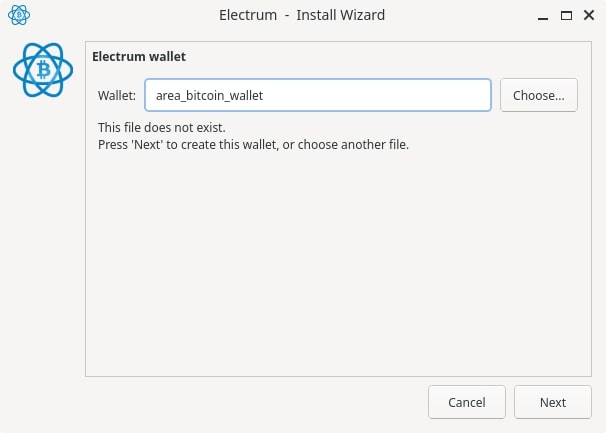
3.1 Choosing a Wallet Name:
When opening Electrum, you’ll be prompted to choose a wallet name. Let’s create a wallet named “area_bitcoin_wallet.”
Click “Next.”
3.2 Selecting Wallet Type:
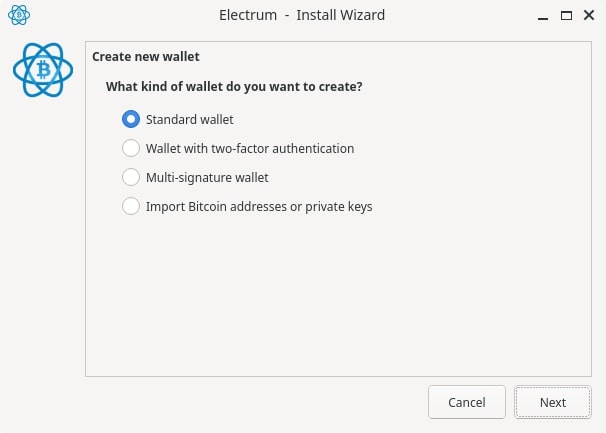
On the next screen, you’ll have several options, including creating a wallet with two-factor authentication, importing Bitcoin addresses or private keys, or even setting up multi-signature wallets.
For this guide, select the standard wallet option: “Standard Wallet.”
3.3 Generating Wallet Seeds:
On the next screen, there are options to import a seed, use a master key from another wallet, use seeds from a connected hardware wallet, or generate a new seed.
In this case, we will generate a new seed through Electrum by selecting “Create a new seed”.
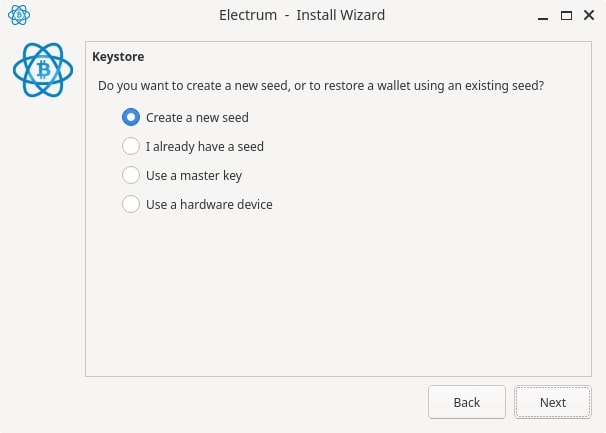
The 12 words of your wallet will be generated and displayed to you. Be sure to write them down carefully as they are your only key to accessing your bitcoins!
If you choose to also generate a “passphrase,” click on “Options” and check “Extend this seed with custom words”, then click “OK”.
Once done, a new screen will appear for you to choose the passphrase. After entering it, simply click “Next” again.
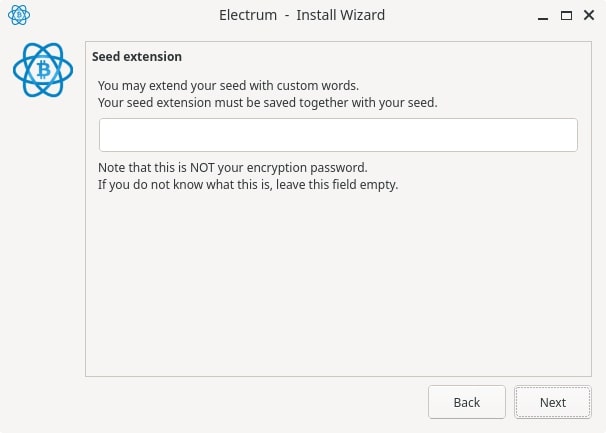
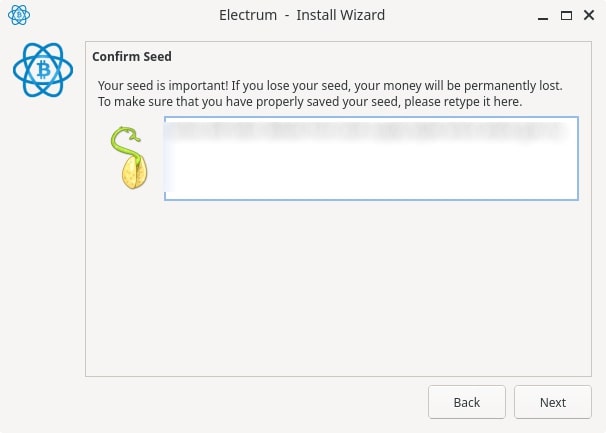
If you do not wish to generate a passphrase for your wallet, you will be redirected directly to the screen below, asking you to confirm the words of your seed.
However, if you entered a passphrase, remember to also type it at the end of your 12 words, or Electrum will not allow you to proceed to the next step.
3.4 Creating a Password to Encrypt the Wallet
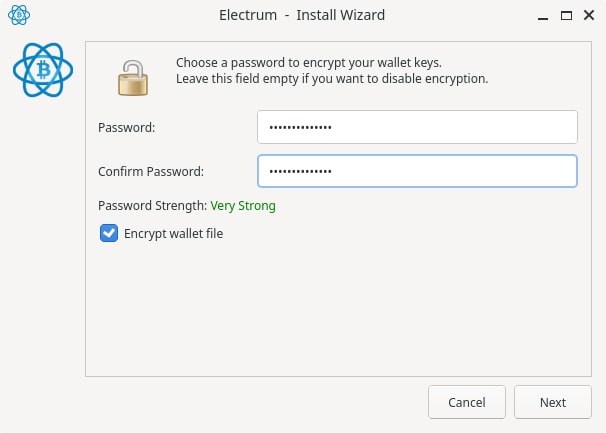
Next, you will be asked to create a password to encrypt your wallet files.
This is an additional security measure. However, if you already consider your setup “secure enough,” you can skip this step (by clicking “Next” without entering a password).
That said, if you choose to create a password, preferably create a strong one and then click “Next”.
Congratulations! You now officially have a Bitcoin wallet set up with Tails + Electrum!
In the next section, we’ll demonstrate how to practically use the wallet we just created to send and receive bitcoins.
Excited?!
4. Practical Use of Electrum
Before we proceed, it is crucial to emphasize: Never, under any circumstances, connect this Tails machine to the internet while your wallet containing your seeds is open.
If it becomes necessary to connect to the internet with the wallet open — whether to update its balance or to send a transaction to the Bitcoin network — it is preferable to create another wallet containing only your extended public key to check your balance (watch-only mode), ideally connected to your Bitcoin Node using TOR for maximum privacy.
4.1 Creating a Watch-Only Wallet
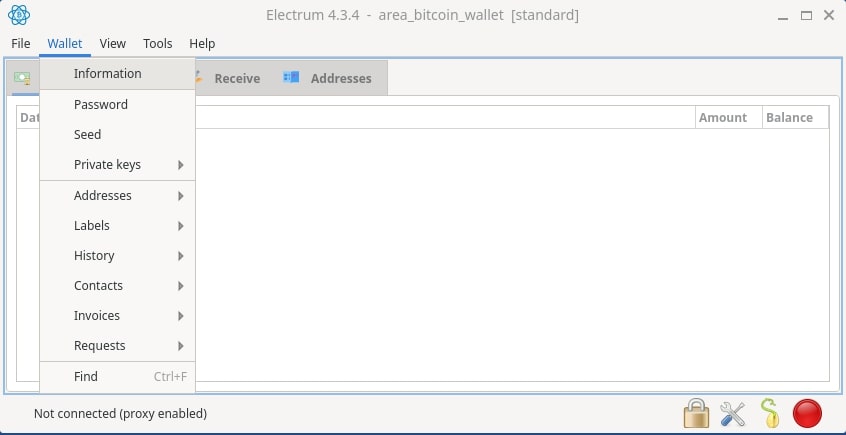
To check the extended public key of your wallet, click on “Wallet” → “Information”.
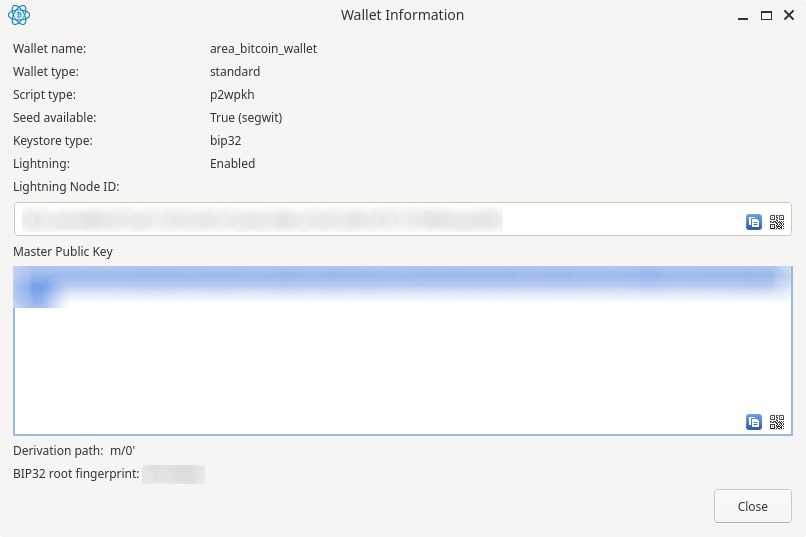
Your extended public key will be displayed under “Master Public Key”. Copy it and import it into the device of your choice (for example, a Blue Wallet or even another Tails device).
In this tutorial, we’ll show that it is possible to use this setup on a single device. However, you must always ensure you disconnect from the internet before opening your wallet containing the seeds.
The recommendation to use the watch-only wallet on another device is a safer approach and ensures that “you protect yourself from yourself.”
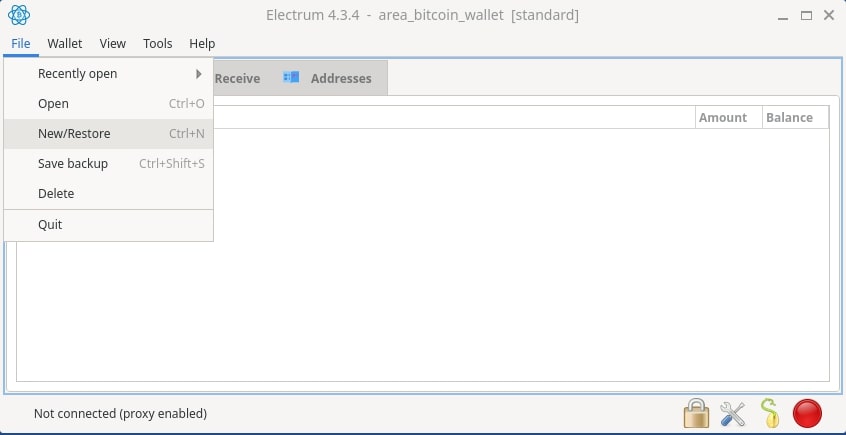
With your extended public key in hand, create a new Electrum wallet by navigating to “File” → “New/Restore”.
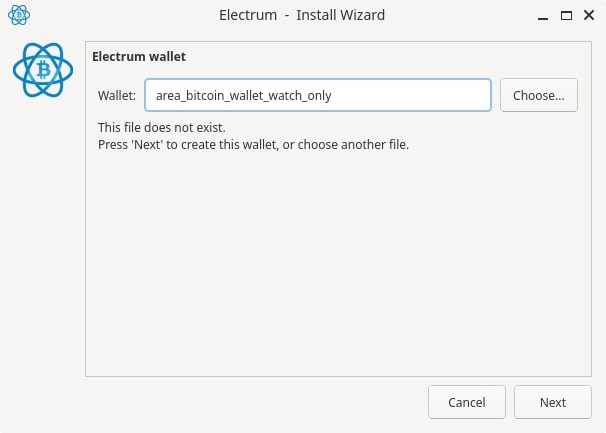
Select a name for the wallet and click “Next”.
In this example, we’ll use the name “area_bitcoin_wallet_watch_only” to differentiate it from the primary wallet containing our seeds.
Select “Standard Wallet” and click “Next”.
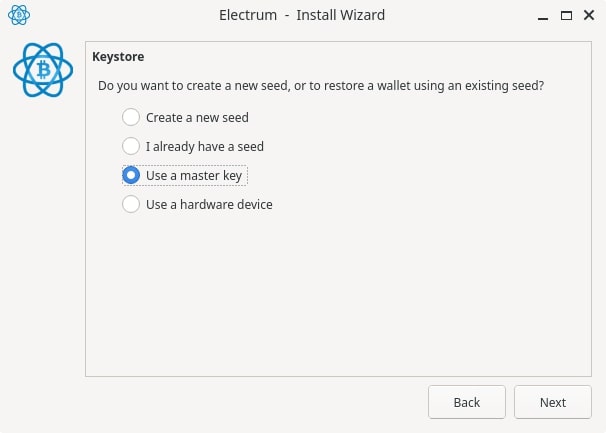
On the next screen, instead of selecting “Create a new seed,” choose “Use a master key” and then click “Next”.
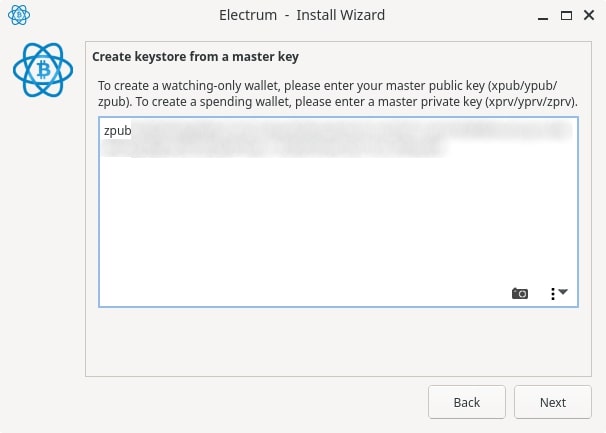
Paste your extended public key into the designated field and click “Next” again.
Note: If the wallet is being created on another Tails device, you can save this key in a text file and transfer it using a USB drive, for example.
On the following screen, you’ll be prompted to create a password specifically for this watch-only wallet.
Up to this point, you should have stored three passwords: the persistent storage password, your seeds, and a password for your Electrum wallet containing the seeds.
If you feel it necessary, you can create an additional password for this wallet, which will only track the balances of your addresses.
In this instance, we will not create a password for this wallet because this Tails device has a single purpose: managing bitcoins without accessing the internet, which minimizes the risk of malware infection.
Click “Next” without creating a password.
Before displaying the wallet, a warning will appear reminding you not to send funds to this wallet unless you own its seeds. Since we are indeed the owners of this wallet, click “OK.”

Now, you have two wallets:
- One that will sign your transactions, containing your seeds, and must never connect to the internet.
- One that will track the balances of your wallets and can receive funds without needing to open the other wallet containing your seeds.
Close your primary wallet and leave only your “watch-only wallet” open for the next steps in the tutorial.
4.2 Receiving Bitcoins in the Electrum Wallet
In your watch-only wallet, navigate to the “Addresses” section.
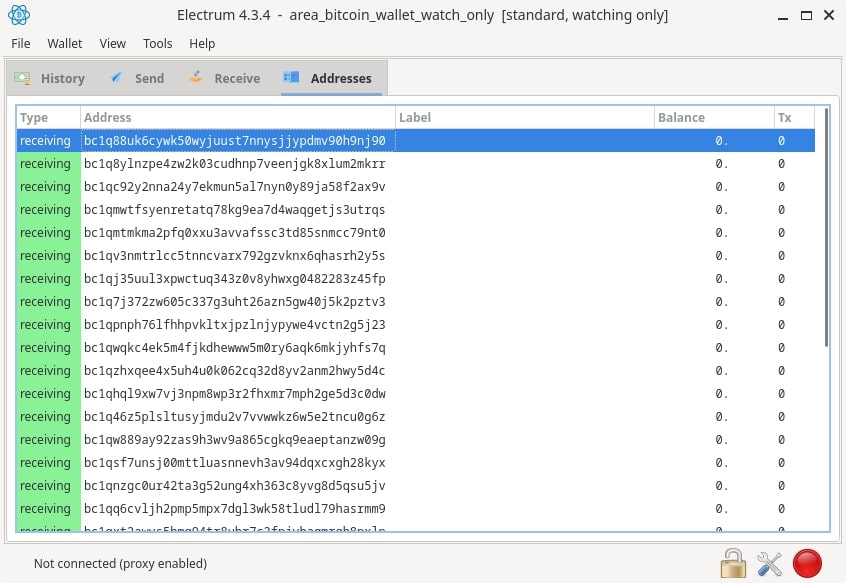
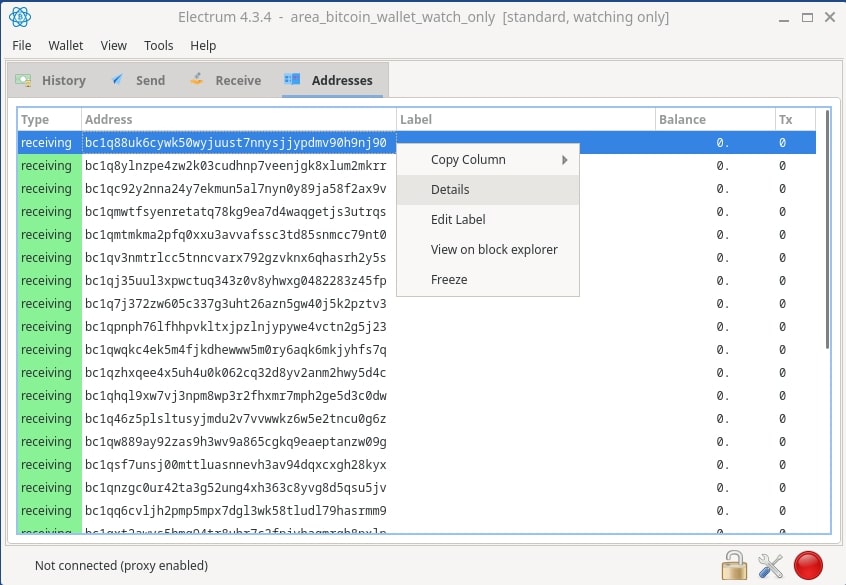
Select the Bitcoin address where you want to receive funds, right-click, and then click “Details” to display the details of that Bitcoin address.
Remember, the sequence of numbers and letters in “Address” is your Bitcoin address. You can either copy it and send it to the payer or generate a QR code for this address by clicking on the QR Code icon (as shown below).
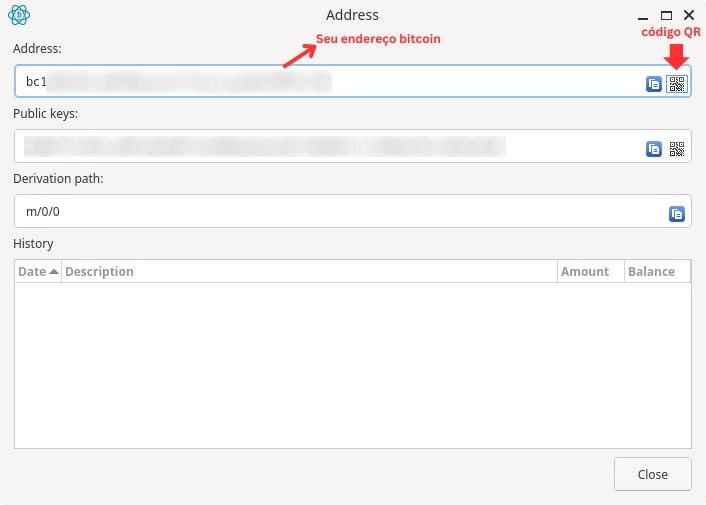
Clicking the QR Code icon will display a window similar to the one shown below.
You can send this QR code to the payer or scan it using a device containing another wallet of yours if your goal is to transfer funds between your own wallets.

To update your balance, you’ll need to connect to the internet. Before doing so, ensure that your other wallet (the one containing your seeds) is closed, especially if it’s on the same Tails device.
After establishing an internet connection (via Ethernet or Wi-Fi), select “Connect to Tor automatically” and then click “Connect to Tor network.”
Once the message “Connection to Tor network successful” appears, you can close this window.
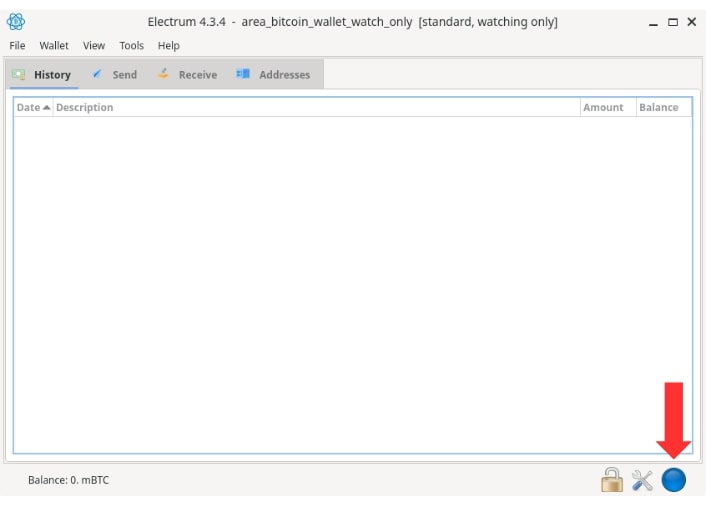
Your Electrum wallet should now display a blue circle in the bottom corner instead of a red one. This symbol indicates that Electrum is connected to the internet and also via Tor.
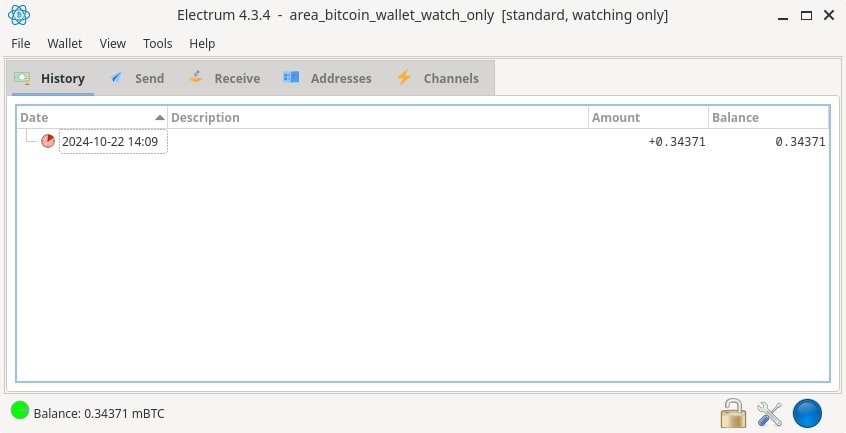
After some time (depending on the miner fee paid and Bitcoin network traffic), your transaction will appear in the “History” section, and your balance will appear in the bottom left corner next to “Balance.”
4.3 Sending Bitcoins Using the Electrum Wallet
To send funds to another Bitcoin wallet using Electrum, follow these steps:
- Disconnect from the internet.
- Create a PSBT (Partially Signed Bitcoin Transaction) in the watch-only wallet.
- Load this PSBT into the wallet containing your seeds.
- Sign the transaction.
- Export the signed transaction as a TXN file.
- Close the wallet containing your seeds (so Electrum encrypts it again).
- Reconnect to the internet.
- Broadcast this transaction using your watch-only wallet, ensuring your seeds remain completely secure.
In your watch-only wallet, ensure you’re disconnected from the internet and navigate to the “Send” section.
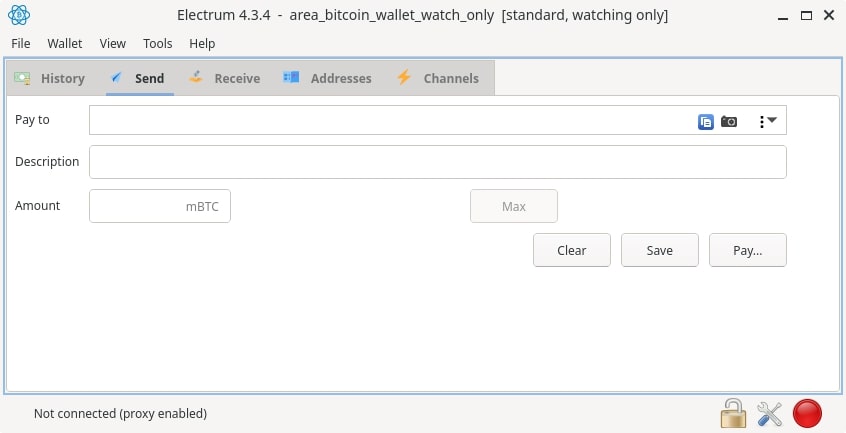
Note that the red circle in the bottom-right corner signals you’re offline.
In the “Pay to” field, paste the recipient’s Bitcoin address.
Use the “Description” field to include details about the payment (optional, e.g., to describe the reason for the transaction).
Specify the amount to be sent in the “Amount” field. To send the wallet’s entire balance, click “Max.”
As we are disconnected from the internet, we need to define the fee to be paid for the transaction manually, since it will not be possible to consult the blockchain and choose an appropriate amount directly in Electrum
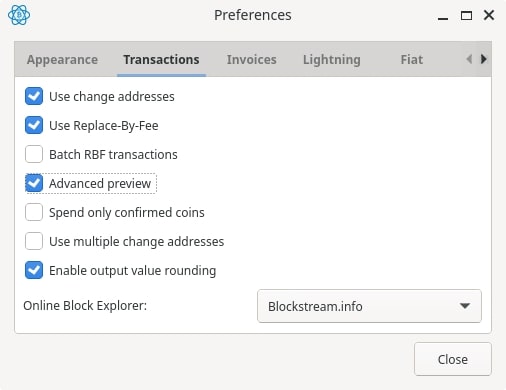
For that, click on “Tools” → “Preferences” and select “Advanced Preview.”
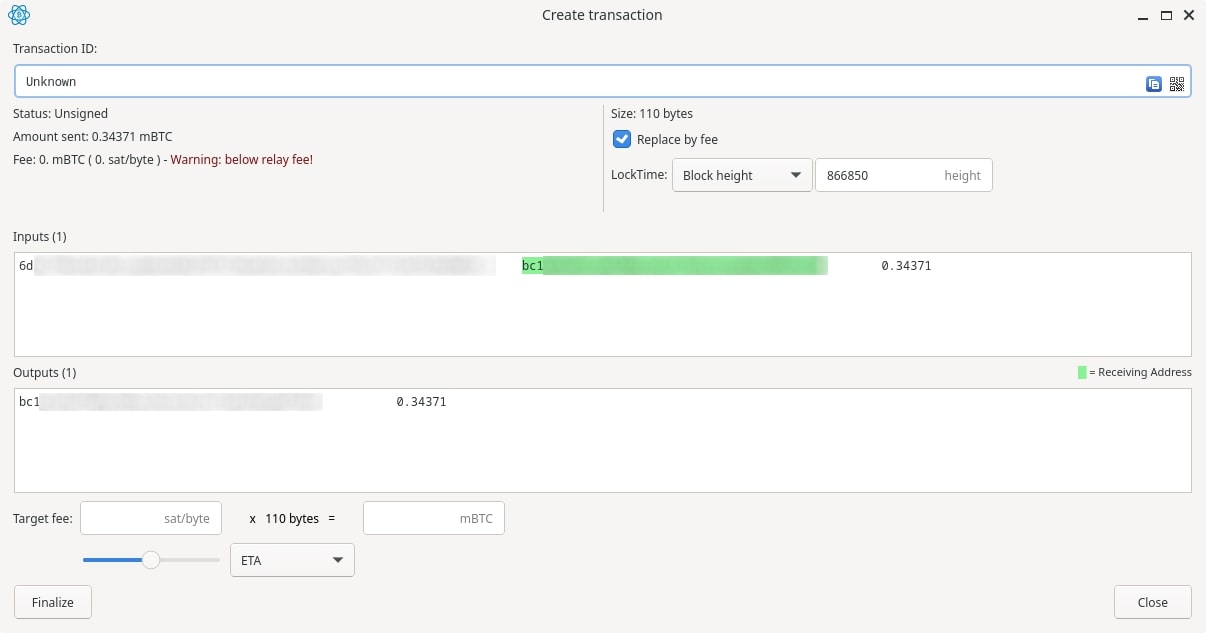
Return to the “Send” tab and click “Pay.” You’ll be redirected to the following window:
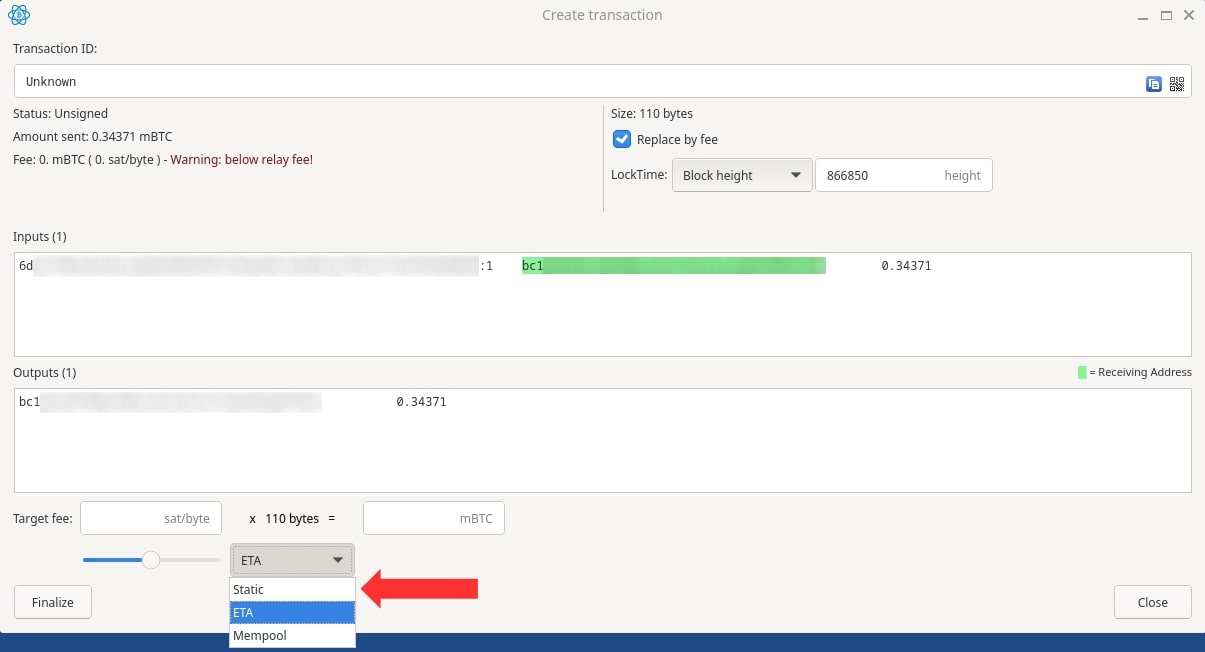
Click on the arrow in the “ETA” button (bottom-left corner of the menu). After that, you’ll see 3 options, Select “Static.”
On another device, access a Bitcoin block explorer (e.g., mempool.space) to check current network fees.
Based on these rates, configure the fee to be paid according to your convenience. If you want to pay less, put a lower fee. If you want the transaction to be processed quickly, pay a higher fee, and so on.
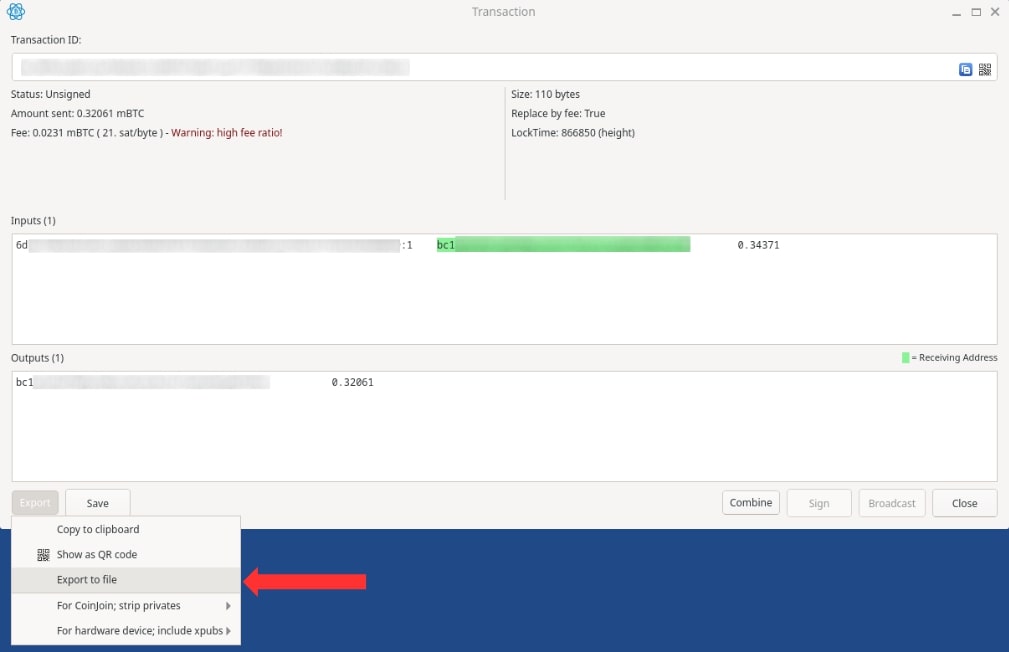
After setting the fee, a final screen will appear before exporting the PSBT of this transaction.
On the bottom left corner click “Export” → “Export to File.”
Choose where to save this file and click “Save.” Once done, you’ll see the following confirmation message:

Now, while still disconnected from the internet, switch to the wallet containing your seeds. To do this, go to the top menu and click on “File” → “Recently Open” → “your_wallet_name.”
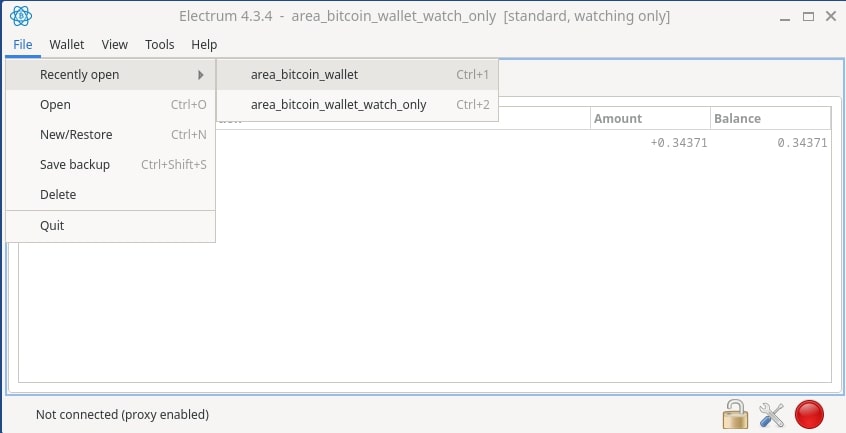
Once done, you will be prompted to enter your password. After that, in the top menu, go to “Tools” → “Load Transaction” → “From File.”
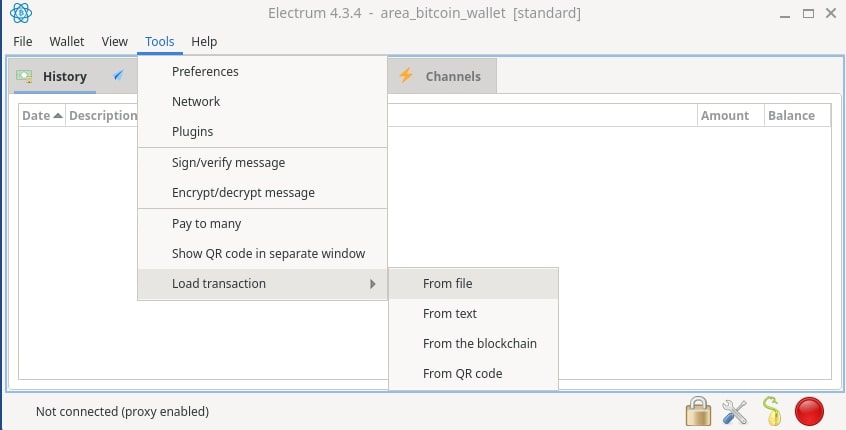
Select the .psbt file you exported earlier.
After doing so, you will see a screen very similar to the one in your watch-only wallet, except this time the “Sign” button will be enabled.
Click on this “Sign” button.
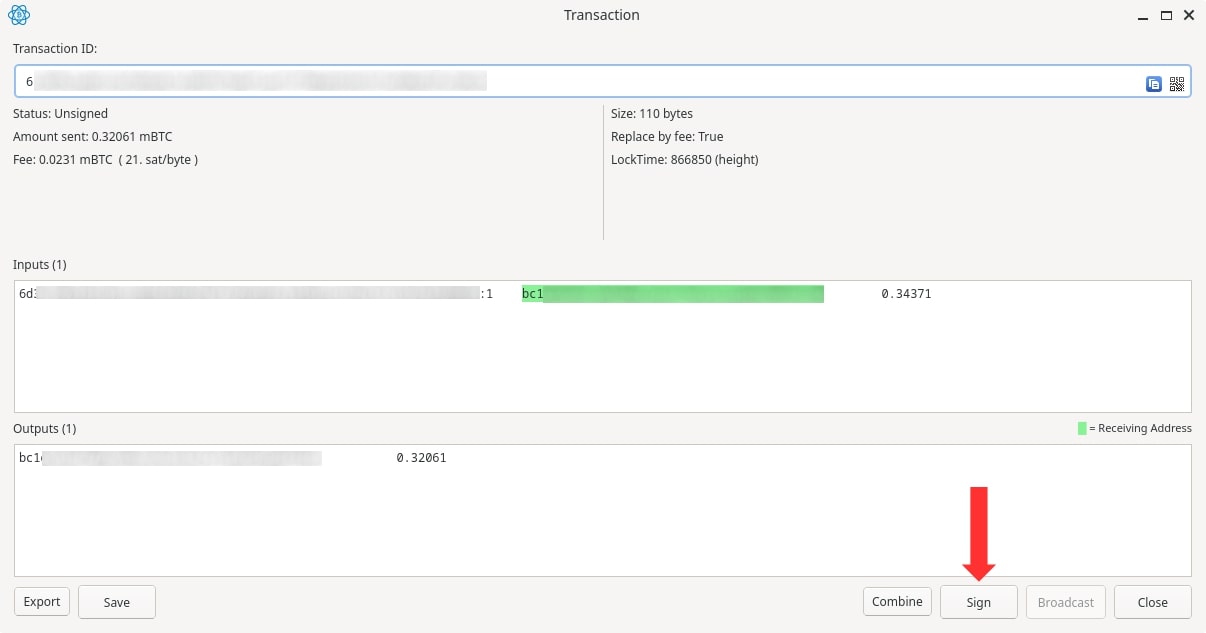
You will be prompted to enter your Electrum wallet password once again. After entering it, click “OK.”
Next, export this signed transaction. Click once more on “Export” → “Export to file.”
Now, choose where to save this file and click “Save.”
We’re almost there! Now we just need to broadcast this transaction to the Bitcoin network. To do this, close the wallet (the one containing your seeds), reconnect to the internet, and open your watch-only wallet.
Click on “Tools” → “Load Transaction” → “From File.”

Select the .txn file, which is your signed transaction.
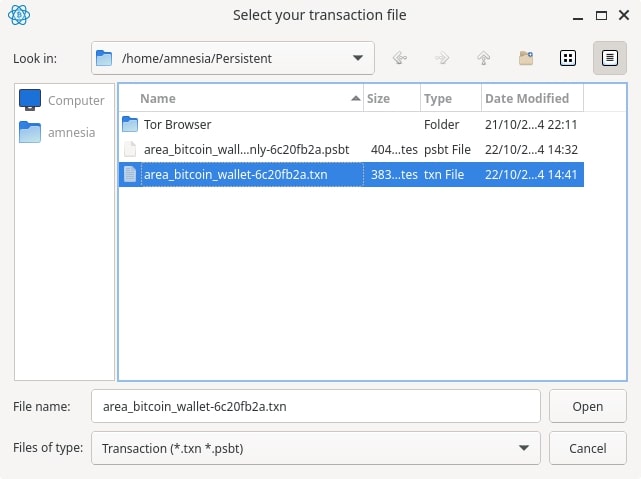
On the next screen, click “Broadcast.”
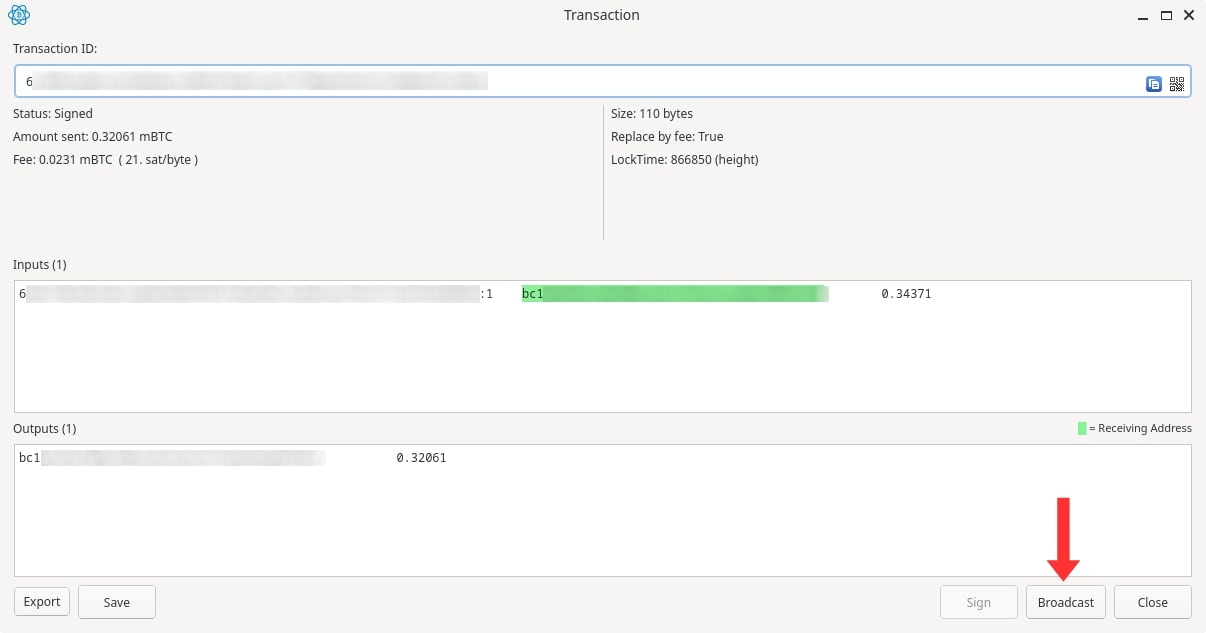
A confirmation message will appear with the ID of your transaction.
Done! Your transaction has now been signed, and your bitcoins have been sent to the destination address.
Check the “History” section to see your latest transactions, including this most recent transfer, which will be confirmed after some time.
Tails + Electrum Recommendations
While the Tails and Electrum combination offers excellent security and anonymity, following these recommendations will help you maximize their benefits:
- Keep Tails Always Updated: Regularly update Tails to ensure you have the latest security patches and bug fixes. This is critical for maintaining a secure environment.
- Use the Tails + Electrum Environment Exclusively for Bitcoin Transactions: Avoid using the Tor browser within this setup for general browsing or accessing the dark web. Doing so may expose you to additional risks. To minimize vulnerabilities, dedicate this environment solely to sending and receiving bitcoins.
- Avoid Unnecessary Plugins in Electrum: Third-party plugins can introduce security risks. Keep your Electrum wallet setup simple and free from unnecessary add-ons.
- Always Use Secure Networks: Avoid public or unsecured Wi-Fi. Although Tails routes traffic through Tor, untrusted networks can still pose risks, especially if someone is monitoring local traffic.
- Consider Using a Watch-Only Wallet on Another Device: To minimize the risk of losing your bitcoins due to human error, use a watch-only wallet on a separate device to monitor balances. Keep the device containing your seed phrase offline at all times, ensuring maximum security.
- Use a Bitcoin Node When Possible: By default, Electrum connects to a randomly selected Bitcoin node. To enhance privacy and prevent exposing your extended public key, use your own Bitcoin node, preferably one running on Tor. Options like Umbrel or Raspblitz are excellent choices for setting up a personal node.
Conclusion
The combination of Tails and Electrum provides a powerful solution for those seeking enhanced security and privacy in Bitcoin transactions. With Tails protecting your operating environment and Electrum securely managing your Bitcoin, this setup offers a significant level of anonymity and defense against potential attackers and surveillance.
That said, this setup does come with some challenges. It requires careful attention and a certain level of technical knowledge to create bootable operating system images on removable media, which may pose difficulties for non-technical users.
I hope this article has helped you better understand the Tails + Electrum combination and eased any hesitations about using it.
Thanks for reading, and take control of your privacy—opt out!
Share on your social networks:
Area Bitcoin is an educational Bitcoin school that aims to accelerate the financial and intellectual sovereignty of all individuals.
Did you like this article? Consider buying us a cup of coffee so that we can keep writing new content! ☕

