One of the biggest challenges for new Bitcoin users is secure storage. Cold wallets are often the preferred method for long-term Bitcoin storage, but there are numerous options and devices available.
Security is extremely important for Bitcoiners, and the SeedSigner wallet manages to combine both security and accessibility in a single device.
Additionally, being open-source, this wallet allows anyone to verify the code behind its operation, enabling collaboration in identifying bugs and contributing to ongoing development, ensuring a high level of transparency and trust.
What’s intriguing about this project is that you can build a SeedSigner yourself from the comfort of your home, as long as you have the right parts.
Yes, you read that correctly! It’s possible to assemble a wallet from scratch and experience a taste of engineering sovereignty!
In this article, we’ll explore what SeedSigner is and how it actually works.
Shall we begin?
What is SeedSigner?
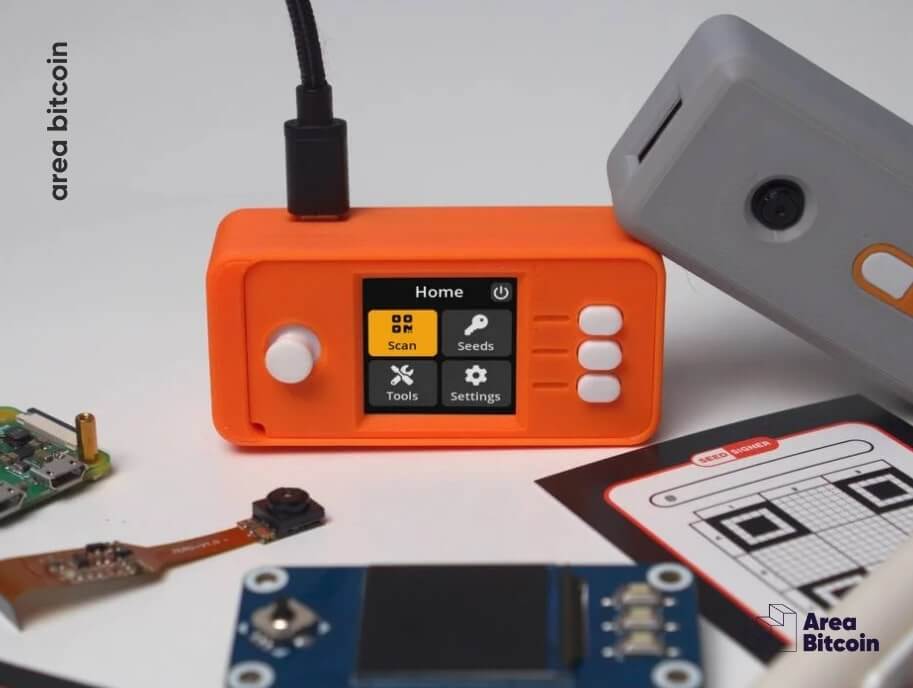
SeedSigner is an open-source hardware wallet project designed for securely storing Bitcoin. It operates without WiFi or Bluetooth connections, powered by an external battery or USB charger.
Launched in early 2021 as a DIY project, it can be assembled using inexpensive, readily available components. The focus is on using the Raspberry Pi Zero 1.3, which is very affordable.

SeedSigner allows users to sign transactions without connecting the device to a computer or mobile phone.
This method of signing is known as “air-gapped” because it enables you to confirm transactions to the Bitcoin network without any physical device connections. All interactions occur through QR Codes using the SeedSigner camera or even with an SD card.
Since it’s an air-gapped wallet, the device remains disconnected from any network, including the Internet. This isolation provides heightened security against cyberattacks and shields against potentially unsafe networks that could intercept transactions.
In essence, this air-gapped bitcoin wallet offers robust security features for signing Bitcoin transactions and supports multisig (multiple signatures) transactions. While it provides significant security benefits, additional precautions are always advised.
In summary, the goal of SeedSigner is to be a secure wallet for:
- Generating and storing private keys;
- Securely signing transactions via animated QR Codes or SD Card, reducing attack possibilities;
- Being an open-source wallet that the community can verify openly and transparently;
- Offering great cost-effectiveness.
Main features of the SeedSigner Wallet
As we’ve discussed, the SeedSigner isn’t just a build-it-yourself device offering more autonomy; it also boasts a variety of powerful features:
- Calculates 12/24 words for a BIP39 seed phrase
- Creates a BIP39 seed using D6 dice rolls
- Creates a BIP39 seed with entropy from a digital photo
- Guided interface for manually creating a SeedQR for storage/input
- Support for BIP39 passphrase/word 25
- Native Segwit Multisig XPUB generation with QR display
- Scans and analyzes animated QR transaction data
- Signs transactions and transfers XPUB data using animated QR codes
- User settings with optional persistence
- MicroSD card can be removed after software loading
- Live view during photo-to-seed and QR scanning UX
- Optimized seed phrase input interface
- Support for Bitcoin Mainnet, Testnet, and Regtest
- Support for user-defined custom derivation paths
- Derives indexed child BIP85 seed phrases
- On-demand receive/change address verification
- User-configurable QR code density and display brightness
- Responsive, event-driven user interface
Advantages and Disadvantages of SeedSigner
SeedSigner has several advantages, such as:
- Air-gapped (no WiFi/Bluetooth), reducing attack vectors;
- Low construction cost, making the device accessible to more people in more parts of the world;
- Use with multiple seeds and/or multiple wallets;
- Completely free and open-source software architecture allows independent construction from source;
- Use of non-Bitcoin-specific hardware, enhancing user privacy.
However, despite significant advantages, it has some areas for improvement, acknowledged by the developers themselves, such as:
Direct access to seed phrases:
This means that with the device in hand, seeds can be extracted from it. Therefore, it’s essential to take good care of both the device and the seeds. After all, a Raspberry Pi does not have chips like the “secret element” that other devices possess to prevent seed access through the physical device.
Trusting a single device to store multiple keys:
If a single device is used to store all keys in a multisig setup, this factor could become an easy attack vector, as any failure in this single component could compromise the entire setup.
Complete installation via Linux has a larger attack surface:
It becomes easier for malicious code to be inserted during installation.
How does SeedSigner work?
To operate this hardware wallet, you’ll need a specific model of the single-board computer: the Raspberry Pi Zero version 1.3.
This model is chosen specifically because it lacks Wi-Fi or Bluetooth capabilities, crucial for maintaining the air-gapped status of the device. The absence of these wireless modules ensures that private keys remain secure and never exposed.
The communication between SeedSigner and your chosen wallet software occurs via QR Codes. These QR Codes are mutually recognized and verified by both systems during a transaction.
Here’s how it works: Transaction information is displayed on your computer or mobile phone in the form of a QR Code. You simply scan this QR Code using SeedSigner’s camera.
Once the information is captured, it appears on SeedSigner’s display for confirmation. You then verify the details on the screen.
After that, it checks that it holds the correct keys to authorize the transaction. Subsequently, a new QR Code is generated on SeedSigner’s screen. You scan this new QR Code with your computer or mobile phone camera to sign the transaction.
Here are some wallets that are compatible with SeedSigner:
- Specter
- Sparrow
- Blue Wallet
- Nunchuck
- BitcoinKeeper
A Do-It-Yourself Wallet!
SeedSigner is available either pre-assembled or as a kit from various recommended retailers. In the US, an unassembled kit typically costs around $80.
Here are some websites offering ready-to-use SeedSigner devices or kits for home assembly:
- EU/UK: GoBrrr, VULCAN, DIYNodes, BitcoinBrabant, Bitsaga
- USA/Canada: BTC Hardware Solutions
- Australia: HansMade
Given that the project is open-source, you also have the option to build the device from scratch by purchasing the parts separately. Below, we’ll detail the necessary equipment and the steps for configuration.
How to build and configure a SeedSigner from scratch
Now that you understand what SeedSigner is and how it works, it’s time to learn how to build and configure one yourself.
Don’t worry, even though it might sound technical, the process is actually quite straightforward.
The first step is to get the equipment needed to assemble your device. SeedSigner requires the following essential items:
- Raspberry Pi Zero (preferably v1.3, W also works)
- WaveShare 1.3-inch LCD Display with controls (must have a 240×240 pixel screen)
- Camera module compatible with Raspberry Pi Zero
- MicroSD card with at least 64MB capacity
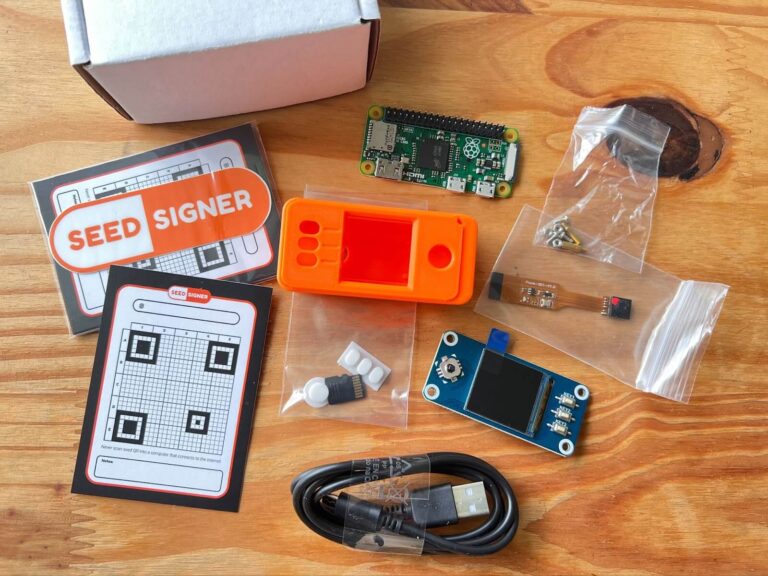
You might have noticed an orange case in the picture above. While the case isn’t necessary for the device to function, there are many open-source 3D printable designs available for free download if you want to give your device a finished look.
Here are some 3D printable case designs.
Once you’ve collected all the parts, the next step is to download the free open-source software and load it onto the device’s SD card. Here are the software links compatible with each Raspberry model:
Finally, to write the software to your memory card, you can use applications like Balena Etcher or Raspberry Pi Imager.
Alright! With your device now assembled and configured, you’re ready to start using your SeedSigner to manage Bitcoin transactions securely.
Using SeedSigner with Sparrow
In this example, we’ll follow the recommendation from SeedSigner’s website and use the Bitcoin Testnet, which is a test network that ensures no real satoshis are risked in this process.
We’ll be using the Sparrow wallet, which is compatible with SeedSigner and supports the Testnet network. You can get Testnet coins here.
With your SeedSigner, go to the main menu and navigate to:
- Seeds > Create a seed > New seed (first option with the camera icon) > click joystick > refilm | accept

After choosing the length of your seed phrase, a screen will display your 12 or 24-word seed, which represents the private key you just created.
Write down these words and verify the accuracy of what you copied using the “Verify Backup” option.
Select the “Done” option to export your private key as a Seed QR. Begin the transcription process by following these steps:
- Backup Seed > Export as Seed QR > Select the desired format.
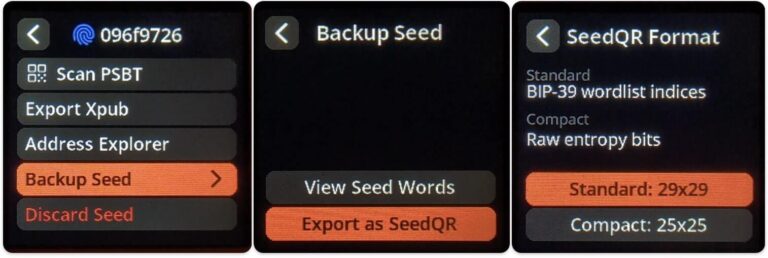
Since we’re creating a 2-of-3 multisig wallet, you’ll need to create three private keys. Repeat the process above for each key and securely save your private keys.
After that, let’s configure the Sparrow wallet, using the Testnet network.
To do this, open your Sparrow wallet and navigate to File > New Wallet:
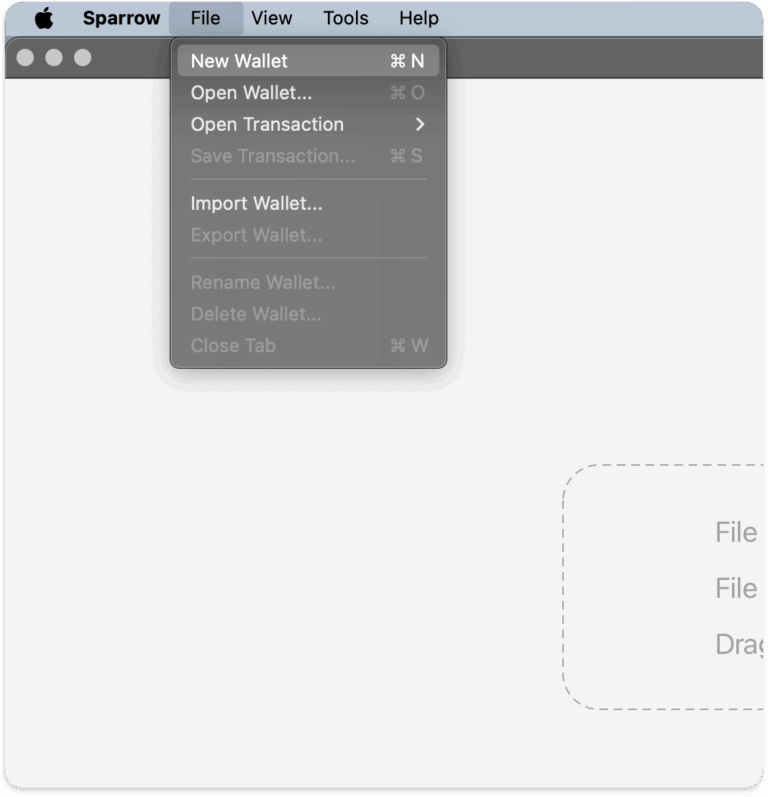
Now, name your wallet and then select the “Multi Signature” option:
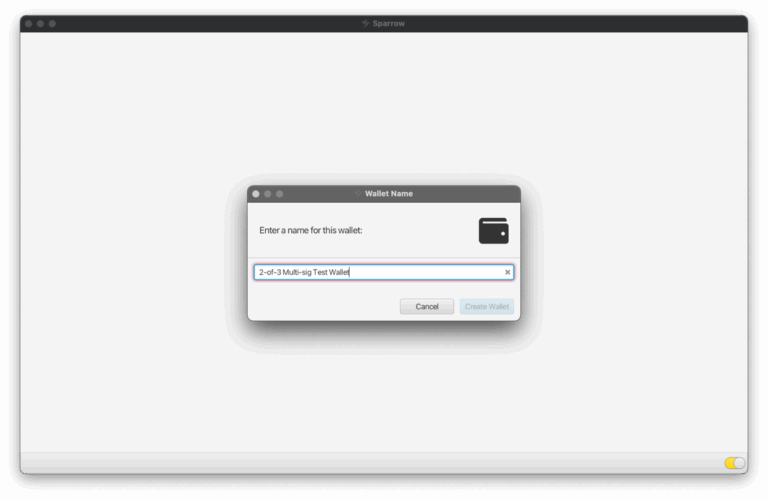
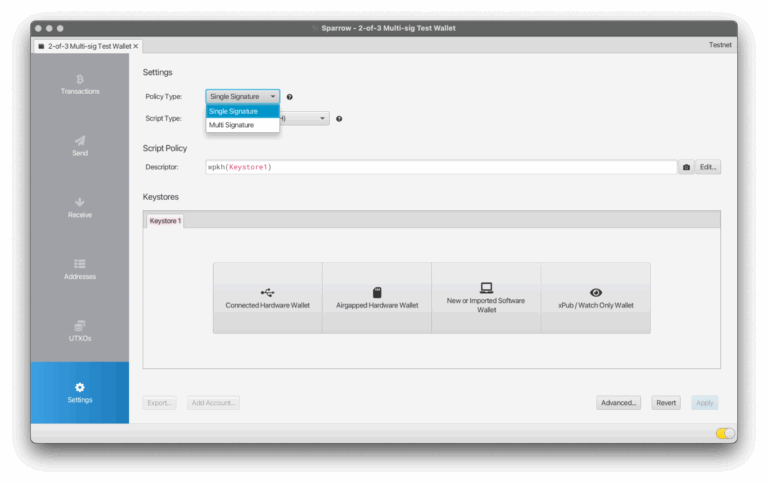
Once selected, the “Cosigners” option will allow you to set how many signatures your wallet will require. Just below, the “Keystores” section will show the number of wallets needed for each signature.
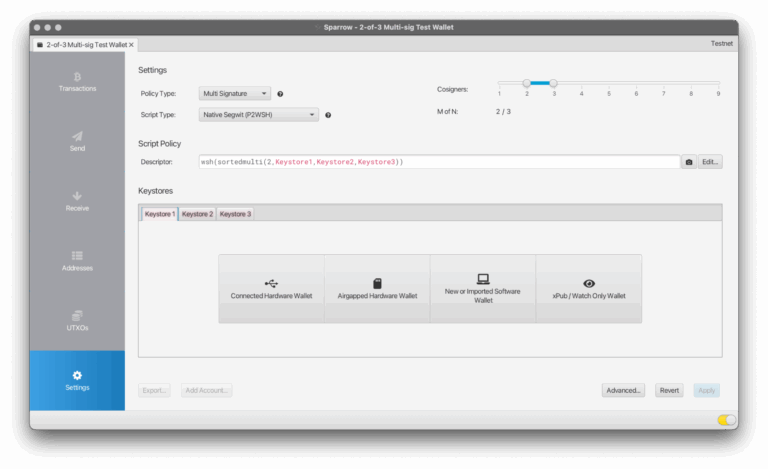
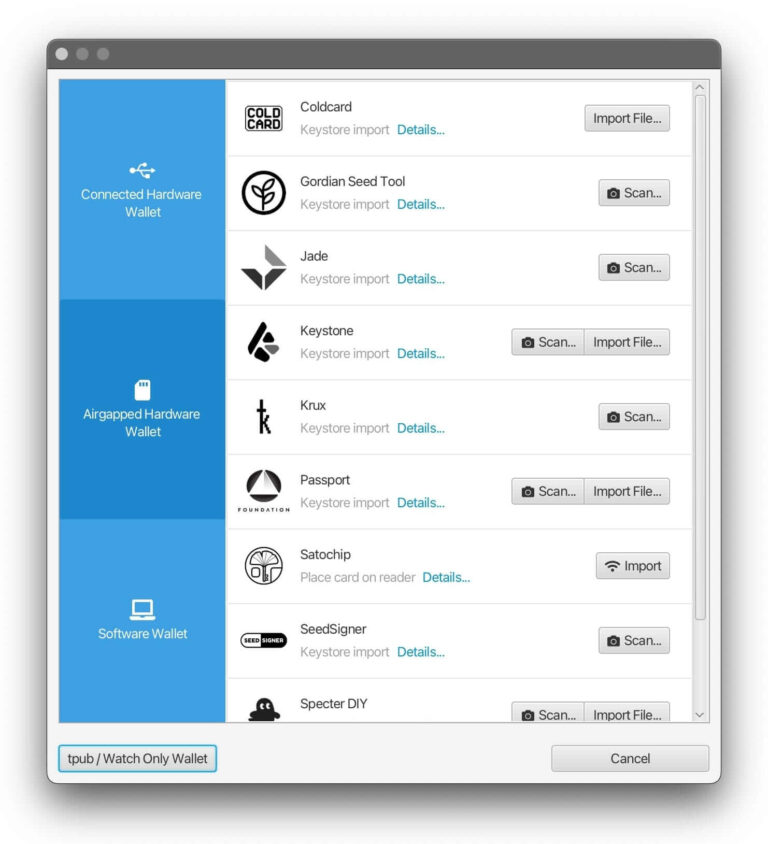
Go to “Keystore 1”, click on the “Air-gapped Hardware Wallet” option, and select SeedSigner:
Return to your SeedSigner and select the Testnet network option:
- Settings > Advanced > Bitcoin Network > Testnet.

Then proceed to:
- Seed > select your seed > Export Xpub > Multisig > Native Segwit > Sparrow > Export Xpub:


Now, just return to your Sparrow wallet, click the “scan” button next to the SeedSigner option, and scan the QR Code with your computer camera:
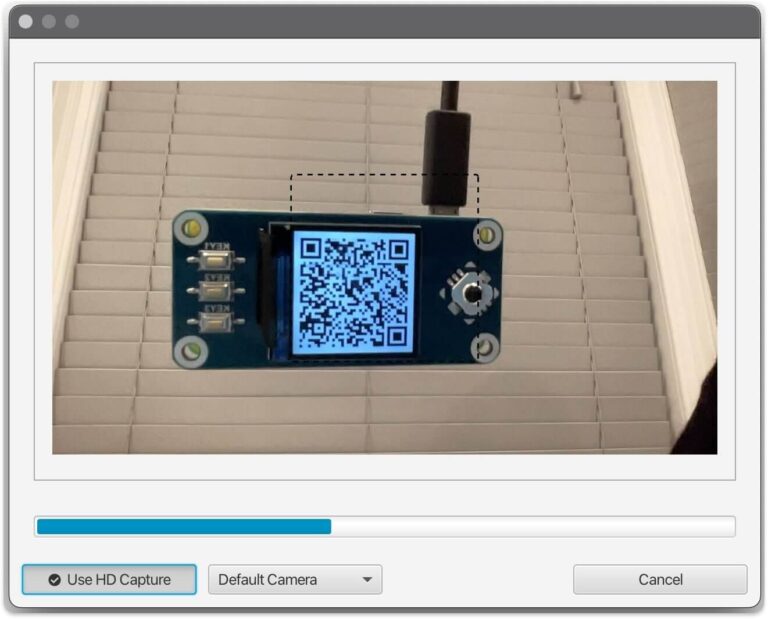
Done! The QR Code was scanned into Sparrow, and the “keystore 1” option appeared as “SeedSigner.” Public key information will be displayed on the Sparrow screen.
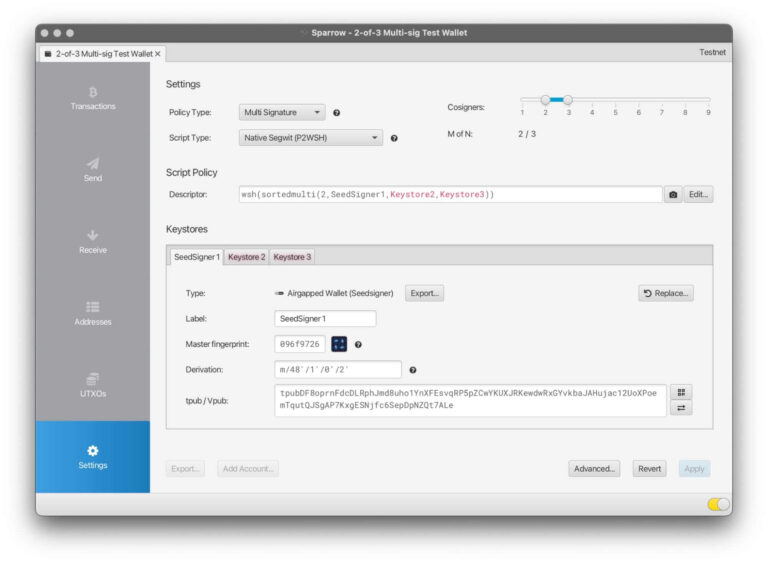
Just repeat this process two more times to create your 2-of-3 multisig.
Once done, click the “Apply” button and set an access password for your wallet:
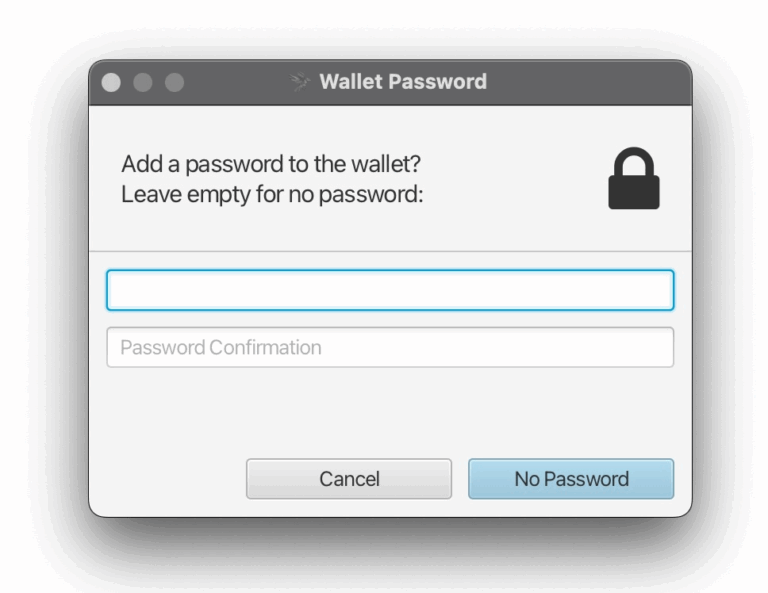
Done! Your SeedSigner with Sparrow is configured!
Easy, right?
Conclusion
As we’ve seen throughout this article, SeedSigner offers a simple, powerful, and relatively inexpensive alternative to traditional hardware wallets. Anyone with the right components can build their own device, providing a unique opportunity for personal sovereignty and independence from wallet manufacturers.
While SeedSigner may not appeal to everyone—requiring a basic understanding of Bitcoin, transactions, and different types of signatures—it is an excellent choice for the more dedicated Bitcoiners who relish the idea of constructing their own wallet.
I hope you found this article informative and engaging, and don’t forget to share it with friends.
Until next time, and Opt Out!
Share on your social networks:

Founder of Area Bitcoin, one of the largest Bitcoin education projects in the world, she is a marketer, passionate about technology, and a full-time hands-on professional. She has participated in major Bitcoin conferences such as Adopting Bitcoin, Satsconf, Surfin Bitcoin, and Bitcoin Conference.
Did you like this article? Consider buying us a cup of coffee so that we can keep writing new content! ☕

